We recommend using Stripe if you want to sell subscriptions. You can also connect other third-party tools, but this guide focuses on Stripe.
If you want to sell physical or digital products, we recommend using our built-in online store integration.
Step 1: Connect your domain
You’ll need to have a custom domain connected to your project when creating a Stripe account, so connect it before continuing.
- Click Publish in the top-right corner.
- When you see the “Project published” message, click Get domain.
- Choose an existing domain or buy a new one.
Step 2: Set up the database for your project
Hostinger Horizons includes an integrated database that you can access directly from the editor using the Data button. Your data dashboard will appear once you ask Horizons to add features that require data collection (e.g., user accounts or contact forms).
You don’t need to connect any external services – simply describe what you need, and Horizons AI will set up the necessary database collections for you.
Message examples:
Add user accounts to my project.
Add a page with a contact form that has name, email, and message fields.
Add a booking page with name, email, date, and time picker.
You can also manage your data manually through the Data button in the editor. To view and manage live user data, you’ll need to publish your website first.
Step 3: Add sign up / log in functionality to your project
With subscriptions, you’ll most likely also need to add user account creation functionality so the subscriptions you sell are connected to user accounts. We recommend adding sign-up / log-in functionality before connecting to Stripe.
Message example:
Add sign-up and login flows to my project with secure authentication.
If you have already added it, you can ask AI to verify it’s properly set up.
Message example:
Check if sign-up and login flows are fully and securely integrated with the database. I plan to use Stripe for subscriptions, so ensure user accounts are properly managed.
Step 4: Set up your Stripe account & subscription
First, you’ll need to create your Stripe account (or log in if you already have one) and set up the subscription product that you want to sell.
- Create a Stripe account: If you haven’t already, sign up for a Stripe account.
- Once you create an account, you’ll be redirected to Stripe Sandbox mode. This mode allows you to test Stripe integration before fully connecting it.
- If you don’t have much experience with tools like Stripe, we recommend fully setting up your Stripe account from the start. To do that, press the “Switch to live account” button in the top-right corner and continue creating your live Stripe account.
- Create subscription:
- Go to the Product catalog in your Stripe dashboard.
- Click + Add a product.
- Give it a name (e.g., “Pro Plan”) and set a recurring price. For testing purposes, we recommend setting the price to 0 for now. This allows you to test the purchase flow without paying the subscription price. You can adjust the price later.
- After creating it, copy the Price ID. You can find it by opening your created product → click the 3-dots icon → click Copy price ID (it will look like
price_...). Copy and save it somewhere safe, you’ll need this later. 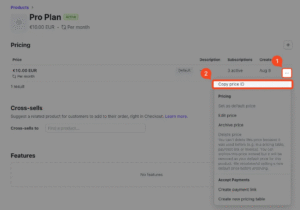
- Copy Stripe API keys:
- Go to the API Keys page.
- You will need two keys:
- Publishable key, which looks like
pk_live_... - Secret key, which looks like
sk_live_.... This key is highly sensitive and shouldn’t be shared with anyone. Save it somewhere safe once you copy it.
- Publishable key, which looks like
Step 5: Set up Stripe webhooks
Webhooks are how Stripe communicates with your project using Supabase. They keep subscription statuses in sync (e.g., when a payment succeeds or fails).
- Ask AI to create a webhook endpoint: Horizons uses an Express API server to handle server-side logic. You’ll need to ask AI to create an API route that receives Stripe webhook events and updates user data in the database accordingly.
Message example: Create an API route on the server that exposes an endpoint URL for handling Stripe webhooks. You can name it stripe-webhook. Don’t make any other changes to the project! - Create a Webhook endpoint in Stripe:
- Go to the Webhooks section in Stripe
- Click + Add destination.
- In the first step, select Your account, and in the events section, select these events (you can search for them using the search field):
checkout.session.completedcustomer.subscription.updatedcustomer.subscription.deleted- Once selected, press Continue.
- In the next step, select Webhook endpoint and press Continue.
- In the next step, fill in these fields:
- Destination name: enter a name like “Supabase webhook for subscriptions”
- Endpoint URL: enter the URL that AI generated in Supabase. You can find it in the Supabase dashboard → select organization and project → Edge Functions → copy the URL next to
stripe-webhooksand paste it in Stripe’s Endpoint URL field.
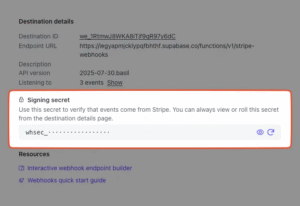
- Copy webhook signing secret:
- After completing the steps above, Stripe will provide a signing secret (it looks like
whsec_...). - Copy and save it somewhere safe, you’ll need this later.
- After completing the steps above, Stripe will provide a signing secret (it looks like
Step 6: Save Stripe keys securely
You’ll need to save your Stripe secret key and webhook signing secret as environment variables so they aren’t exposed in your project’s frontend code. Horizons stores server-side environment variables in the API server configuration, and AI can set them up for you.
Message example:
Add the following environment variables to the API server:
STRIPE_SECRET_KEY = sk_live_…
STRIPE_WEBHOOK_SECRET = whsec_…
Don’t make any other changes to the project!
Replace sk_live_… and whsec_… with your actual keys from Steps 4 and 5.
Step 7: Connect Stripe with your Horizons project
This is the final connection step. You’ll need to ask the AI to fully and securely connect your Stripe account to the subscription you created for your Horizons project.
Use the message below as a template — make sure to replace the placeholder values before sending:
- Stripe product price ID, which looks like price_…
- Stripe publishable key, which looks like pk_live_…
- Replace your_domain with your Horizons project domain.
Message example:
I want to securely integrate Stripe to sell subscriptions in my Hostinger Horizons project.
I have already stored my Stripe keys as environment variables on the API server:
Secret key: STRIPE_SECRET_KEY
Webhook signing secret: STRIPE_WEBHOOK_SECRET
Step 1: Checkout session & webhooks
Create an API route on the server that handles Stripe checkout sessions. When a user starts the subscription purchase flow, securely create a Stripe Checkout session using my stored secret key and return the session URL for redirecting the user.
When creating the Stripe Checkout session, pass both success_url and cancel_url. Make sure these URLs use my site’s domain: your_domain.
Create a Stripe customer and save the generated stripe_customer_id to the database.
For any updates received from the Stripe webhook, use the stripe_customer_id to find and update the correct user record in database..
Step 2: Subscription product
Add my Stripe subscription product to the Horizons project.
Stripe product price ID: price_…
Stripe publishable key: pk_live_…
Add an “Upgrade” button in the project that triggers the subscription purchase flow.
Ensure the subscription is fully linked to the user database.
Only users with an active subscription can access premium features.
Step 3: Access control
Instantly grant users premium access after purchase.
Ensure subscription status is checked in real-time when users log in, create an account, or try to access premium features.
Step 4: Security & correctness
Ensure the integration is secure and does not expose secret keys to the frontend.
Handle all Stripe communication server-side via the API server.
Step 8: Allow users to manage their subscriptions
Once you have a fully working subscription purchase flow, you can add Stripe’s customer portal, allowing users to manage their subscriptions (update payment methods, view invoices, cancel, etc.).
- Go to Stripe Customer Portal settings.
- Find the Launch customer portal with a link section.
- Click Activate link to enable the customer portal.
- Go back to Horizons and ask Horizons to integrate the Stripe Customer Portal into your project.
Message example:
Create a new API route on the server that securely generates a link to the Stripe Customer Portal for the logged-in user.
Then, add a “Manage subscription” button to my project. This button should be visible only to paid users. Clicking it should redirect users to the Stripe Customer Portal, where they can manage their subscriptions.
Other tips
- Publish your project after making changes and test the subscription purchase flow by creating a new account on your project.
- You can find and manage all subscriptions on the Stripe Customers page. If you want to cancel subscription, select the user → in the Subscriptions section, click the 3-dots icon → click Cancel subscription.
- You can ask AI to hide the subscription purchase flow if the user already has one and add an indication showing that the user has a subscription.
- You can also ask AI to enable certain features of your project only for users with a subscription. For example, in a to-do list app, you could set a maximum number of tasks free users can create, and once they reach that limit, they’d need to subscribe.
Errors or bugs fixing
If you encounter issues or notice bugs during or after the Stripe connection process, try asking AI to fix them by providing as much context as possible.
Example 1: If you get an error after trying to enter the subscription purchase flow, take a screenshot of the error, attach it to your message, and describe when it occurred and what the correct flow should be.
Message example
Clicking the “Upgrade” button throws an error (see attached screenshot). Clicking that button should redirect the user to Stripe for subscription purchase and then return them to my project with the account upgraded. Identify and fix the issue.
Example 2: If, after purchase, the user doesn’t have a subscription, provide context about when the issue occurs and what the expected flow should be.
Message example
After completing the subscription purchase flow, users are redirected back to the project, but their subscription status is not updated, and premium features are not unlocked. Ensure the subscription is verified on return and the user is granted access to premium features immediately. Identify and fix the issue.