To use your domain for Titan Email with your domain, make sure that you have the necessary configurations in your domain’s DNS zone. To set it up, you can either watch the video tutorial or follow the step-by-step instructions below:
Preparations
Before starting, make sure that:
-
You are the owner of the domain name and have access to the domain’s DNS zone
-
If you’re using the Free Titan Email included in your hosting plan, the domain must be added to the hosting plan. In case your website is hosted elsewhere or you haven’t built it yet, you can create an empty website so the free email order can be created on your hosting plan
-
If you’re using the Titan Business or Titan Enterprise standalone (without a hosting plan), the domain should not added to any hosting plan either on your account or any other Hostinger account
Where to make the changes?
-
If your domain is pointing to Hostinger by NS records, go to Websites → Dashboard and search for DNS Zone Editor.
-
If your domain is pointed elsewhere by nameservers, the DNS record needs to be set up at the platform to which your domain is pointed
Setting up MX records
Before you add the new values, make sure to delete any old values of MX records – otherwise, it can affect your email performance.
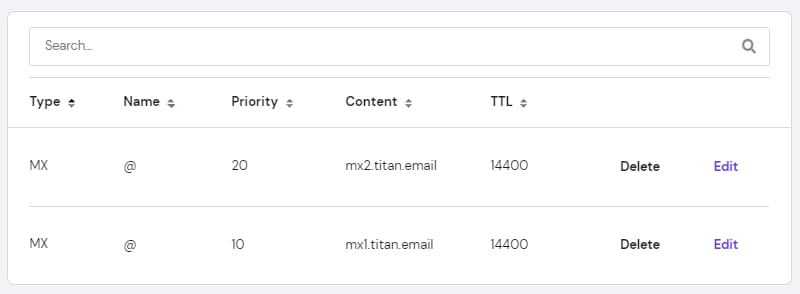
Next, create the following MX records:
|
Priority |
Host |
Points to |
TTL |
|
10 |
@ |
mx1.titan.email |
default |
|
20 |
@ |
mx2.titan.email |
default |
The result should look like the following:
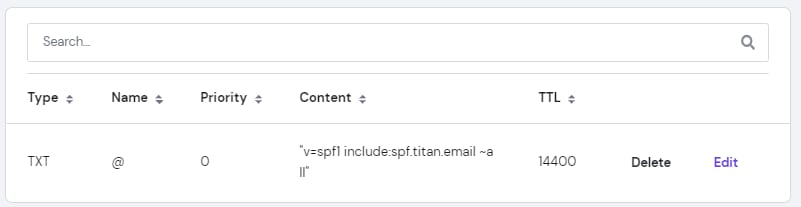
Setting up an SPF record
To prevent emails from going to the spam folder, you need to add an SPF record. SPF is a type of TXT record.
If you have any previous SPF records, delete them and add the following TXT record to your domain:
|
Name (Host) |
@ |
|
TXT value |
v=spf1 include:spf.titan.email ~all |
|
TTL |
Default value |
The result will look like this:
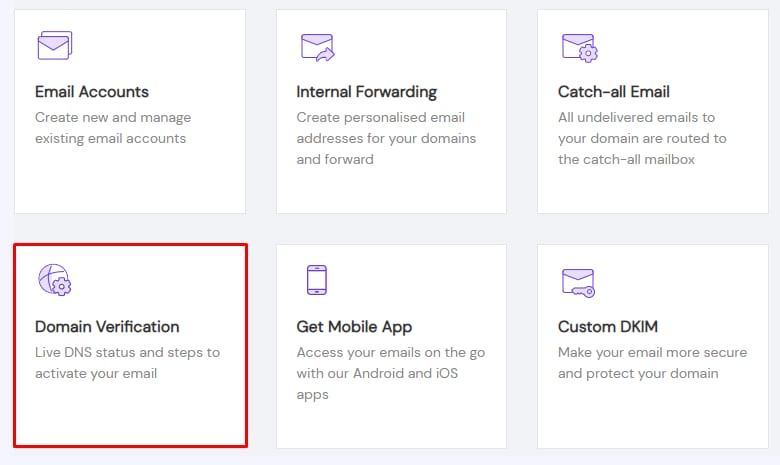
All settings are done! Once these changes are propagated (up to 24 hours), go to Emails → domain name → Domain Verification:
Scroll to the bottom of that page, check the option indicating you have made the changes, and click on Verify my domain:
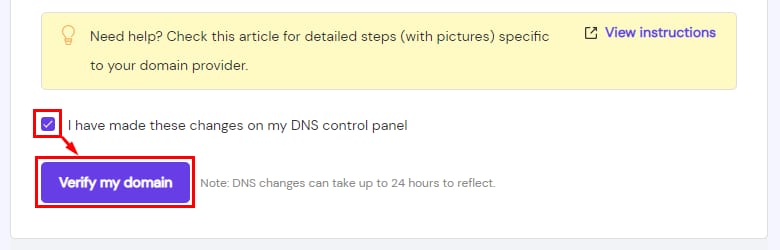
Once the domain is verified, you will be able to use your Titan Email right away.
NOTES
-
With Titan Email, your email messages are automatically authenticated with a default DKIM signature. To create a custom one, check this article: How to Add DKIM Records for Titan Email
-
To create a DMARC record, refer here: How to Add a DMARC Record