When you visit a website, your web browser, router, and server all can save temporary copies of the website. This process is called caching. Instead of downloading the same content every time you load a page, your device pulls it instantly from this local storage, making your browsing experience much faster.
However, because your device is using a saved copy, some changes made to your website may not appear right away. This means you might get an old layout, missing images, or even an error page, leading you to believe your website is completely broken or offline when it is actually working perfectly for everyone else.
To fix this and access the live version of your website, you need to clear the old data out of these temporary storage locations. This guide will walk you through clearing the cache on different places where it may be stored.
Step 1 – Test your website externally
Before changing any settings, confirm whether the issue is happening globally or if it is isolated to your local device and network.
- Switch networks: Turn off your device’s wifi and open the website using mobile data, or connect via a VPN. If the website loads correctly, your hosting server is working fine, and the issue is cached data on your local network or computer.
- Use online diagnostic tools: Check your site using external tools like Down for Everyone or Just Me, GeoPeeker, or TestLocally. These platforms look at your site from global servers. If they show your website is online and updated, you are definitely looking at a cached local version.
Step 2 – Clear local and network cache
Once you confirm the website is working fine globally but failing on your device, clear your local network and device pathways.
Clear local device cache
- Web browser: Open the website in a private or incognito window. If it works there, clear the cache and cookies for that website, then try again. Avoid clearing all browsing data unless necessary.
- SSL state: If you encounter HTTPS or security errors on your device, clear your browser’s SSL state. In most browsers, this happens automatically when you clear the browser cache.
- Reset your network router: Local routers often hold onto old routing data and website files. Turn off or unplug your network router or modem for 30 seconds, then plug it back in to force it to request fresh data from your internet service provider (ISP).
- Flush system DNS cache: If you’ve recently changed your domain or DNS settings, flush your device’s DNS cache to remove outdated DNS records.
NOTE
- If the website is accessible externally but still fails locally after completing all steps, your internet provider might be blocking the connection. You can perform a traceroute to investigate network-level blocks.
Flush Google Public DNS cache
If your DNS propagation is complete but certain lookups still return outdated records while using Google Public DNS, you can manually clear Google’s records.
- Navigate to the official Google Public DNS Flush Cache tool.
- Enter your domain name and select the corresponding record type. For websites, typically it will be A and/or CNAME.
- Click Flush Cache.
This action flushes Google’s public DNS cache. It does not affect other internet service providers or DNS resolvers.
Step 3 – Clear website cache via hPanel
If your custom PHP or HTML website is still showing old data even on mobile networks or external diagnostic tools, the content is likely cached on Hostinger’s servers. You can bypass the cache temporarily to test your site or clear it completely.
NOTE
- Websites created using Hostinger Website Builder and Hostinger Horizons do not have customizable server-side cache settings. As soon as you publish updates on these platforms, the changes become available globally within a few minutes.
Manage hosting cache
This feature allows you to view your custom PHP or HTML websites bypassing the cache to determine if an issue is caused by server-side caching.
- Navigate to hPanel → Websites.
- Click on Dashboard next to the website.
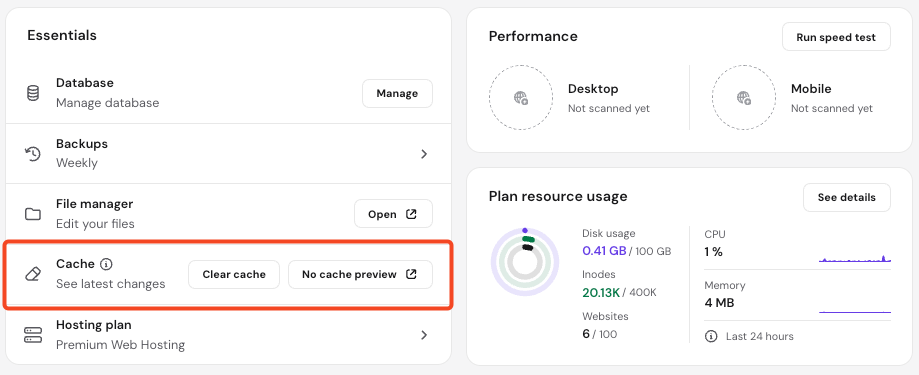
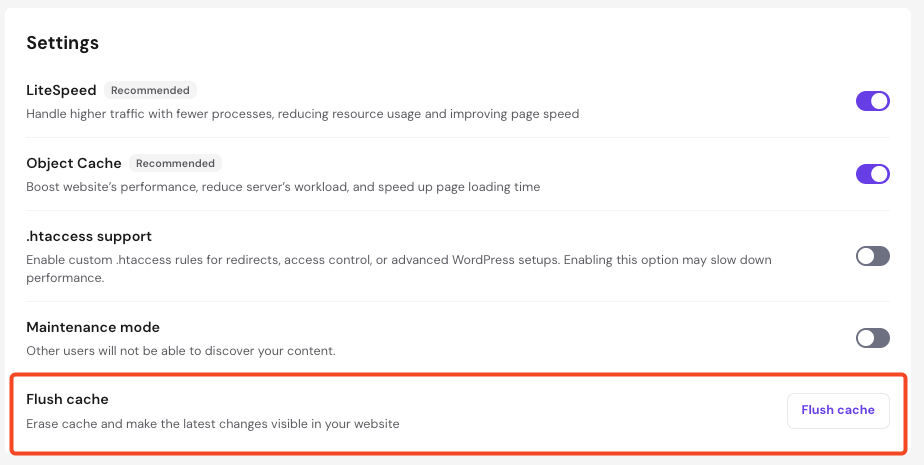
- Depending on your hosting plan type, look for the caching settings on your main dashboard page.
- Web or cloud hosting: Locate the cache options on the Essentials card.

- Agency hosting: Find the Flush cache option in the Settings card.

- Web or cloud hosting: Locate the cache options on the Essentials card.
- Manage your cache using the available buttons.
- Bypass the cache (web/cloud hosting only): Click No cache preview to open a live version of your website that completely bypasses server-side caching. If your website functions correctly here, it confirms a server cache issue.
- Clear the cache: Click Clear cache (or Flush cache on Agency plans) to manually wipe the server-side cache files for your entire website.
Flush Hostinger CDN cache
If you use Hostinger’s Content Delivery Network (CDN), it may also hold onto older copies of your media files.
- Go to Websites → Dashboard.
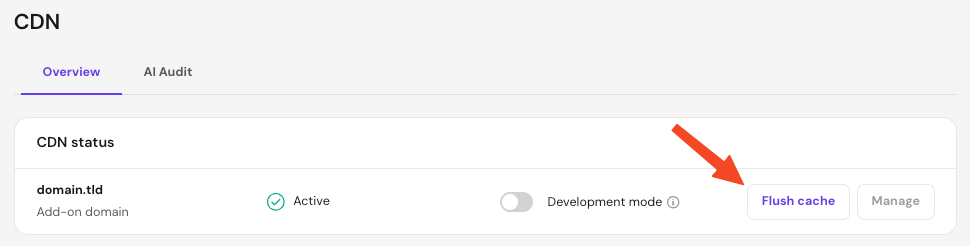
- Select Performance → CDN on the sidebar for web and cloud, or CDN for agency hosting.
- Confirm that the CDN status is active.
- Click Flush cache.

NOTE
- If you use Cloudflare instead, or any other third-party CDN provider, make sure to purge the cache within that platform’s dashboard as well.
Clear WordPress cache
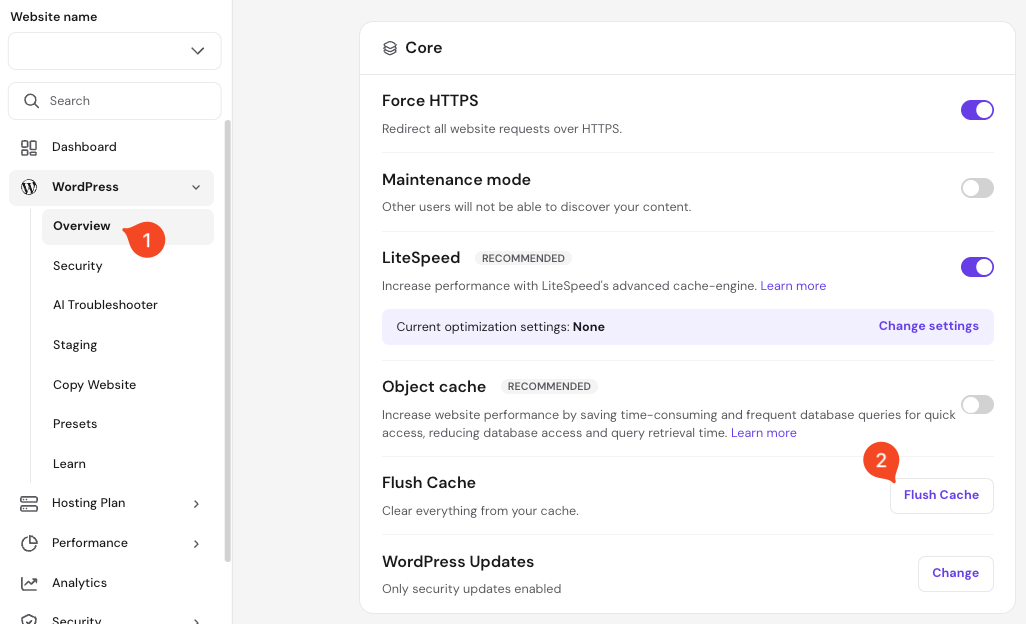
If your website is created using WordPress on a web or cloud hosting plan, you can flush its cache from hPanel. On the website’s dashboard:
- Select WordPress → Overview on the sidebar.
- Click the Flush Cache button in the Core card.

NOTE
- If you use a WordPress caching plugin other than LiteSpeed, navigate directly to that plugin’s settings inside your WordPress Admin area to clear its data.
After clearing any server-side or website cache, remember to refresh your local browser too. Performing these steps ensures that your hosting server, network delivery routes, and local devices all pull the absolute latest version of your website files.