How to schedule an email
Jul 15, 2026
/
Bruno S.
/
6 min Read

To schedule an email, write your message as usual, then set a future date and time for delivery instead of sending it right away. Gmail and Outlook call this Schedule send, Apple Mail calls it Send Later, and classic Outlook uses the older Delay delivery option, and the message waits in a dedicated folder if you need to edit or cancel it.
A scheduled email skips the last-minute check you’d normally give a message before sending it, so confirming the recipient, attachments, dates, and time zone matters more than it does for anything you send on the spot.
Gmail, Outlook, Apple Mail, and Hostinger business email all handle it in a few clicks, and scheduling does more than move a task off your plate: it lets you write on your own time while your message still lands when the recipient is most likely to read it.
If a single scheduled email isn’t enough, for repeated sequences or messages triggered by what a contact does, tools like Hostinger Agentic Mail take over and send automatically without a fixed date attached.
How to schedule an email in Gmail
Gmail supports email scheduling on both desktop and mobile, using the same Schedule send feature built into every Gmail account, free or Google Workspace.
Once scheduled, the message moves to the Scheduled folder, where you can review, cancel, edit, or reschedule it before delivery. You can queue up to 100 scheduled emails at a time.
Gmail sends the message based on the time zone you’re in when you schedule it, not your account’s default time zone. If you travel before the send time, double-check your device’s clock matches the zone you meant.
On desktop
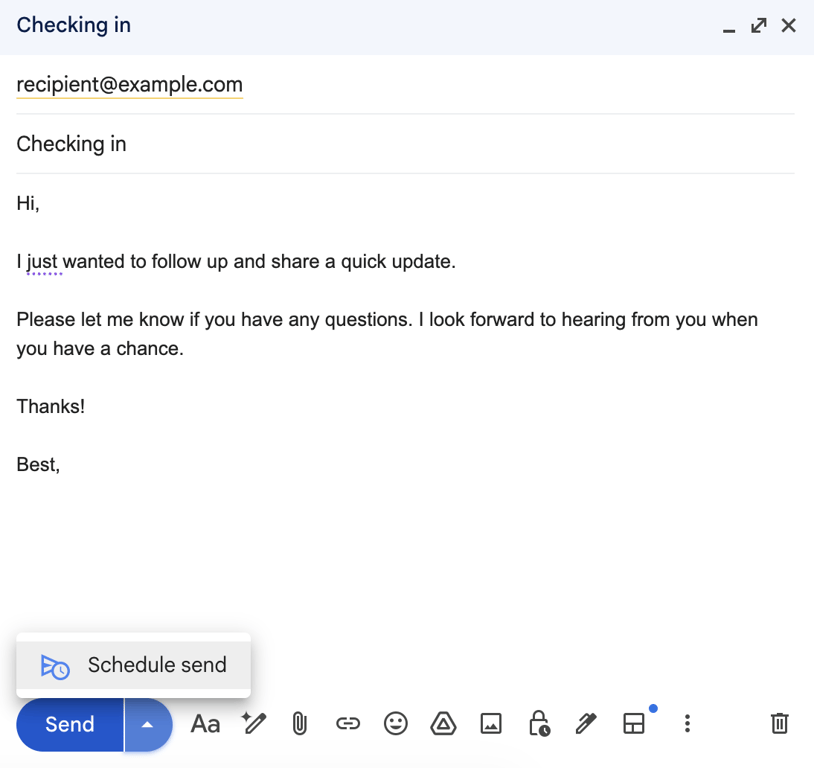
- Click Compose and write your email.
- Click the down arrow next to Send.
- Select Schedule send.
- Choose a suggested time, or click Pick date & time for a custom schedule.
On mobile
The steps are nearly identical on Android and iOS.
- Tap Compose and write your email.
- Tap More (the three-dot icon) in the top right corner.
- Tap Schedule send.
- Choose a suggested time, or select your own date and time.
How to schedule an email in Outlook
Outlook’s scheduling steps change depending on whether you’re using new Outlook, classic Outlook, Outlook on the web, or the mobile app. Each version places the option differently and calls it something slightly different: Schedule send, Send later, or Delay delivery.
Scheduled emails end up in Drafts or Outbox, not a single dedicated folder, depending on which version sent them.
In Outlook on the web and new Outlook
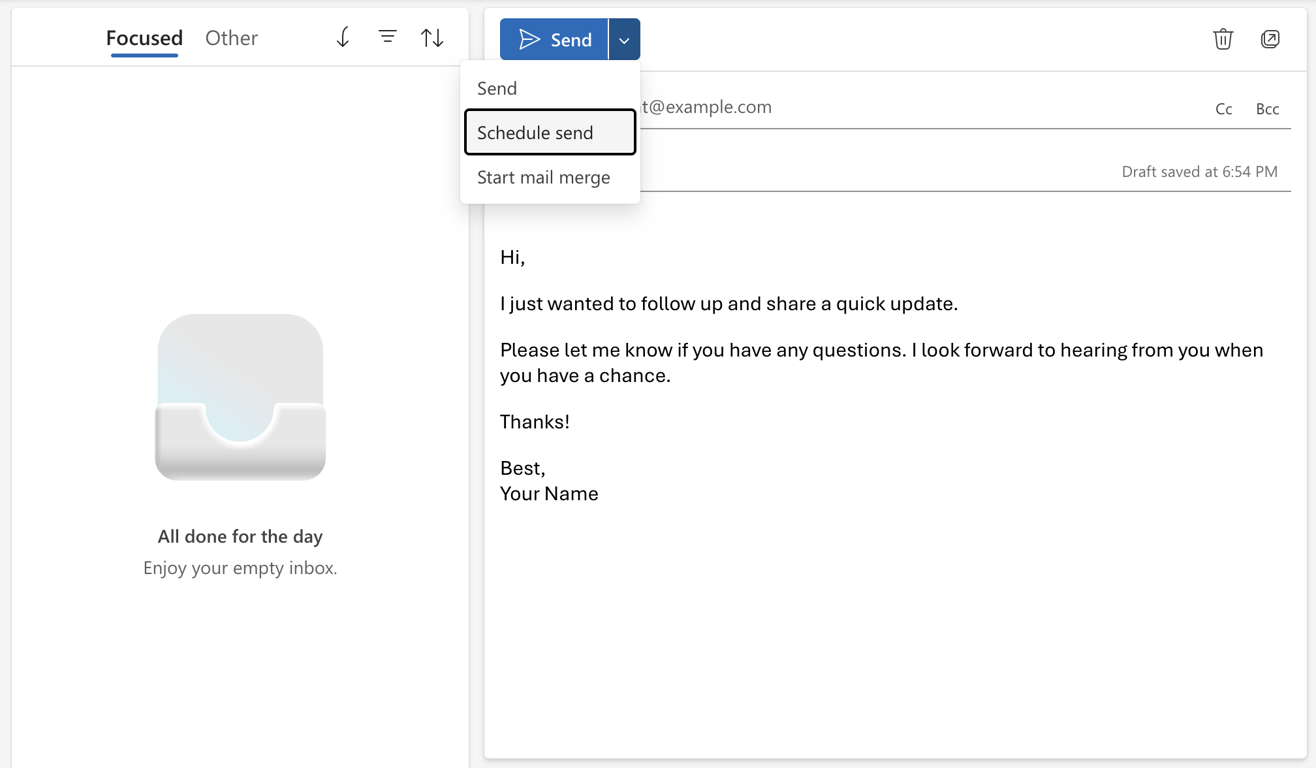
New Outlook for Windows and Outlook on the web use the same Schedule send menu next to the compose window’s Send button.
- Compose your email.
- Click the dropdown arrow next to Send.
- Select Schedule send.
- Choose a default option, or pick a custom time, then click Send.
Schedule send isn’t available for IMAP or POP accounts in new Outlook or on the web, only Microsoft 365 and Exchange-backed mailboxes support it. The message stays in Drafts until the delivery time, and Outlook sends it from Microsoft’s servers even if your device is offline.
In classic Outlook
Classic Outlook for Windows uses Delay delivery instead of Schedule send, and the option lives in the message’s delivery settings rather than next to the Send button.
- Compose your email, then select the small arrow in the Tags group on the ribbon (under Options → More commands if you’re using the simplified ribbon).
- Select Delay delivery.
- Under Delivery options, check Do not deliver before and set your date and time.
- Click Close.
- Click Send.
Delay delivery works with POP and IMAP accounts, including Gmail accounts added to classic Outlook, since it stores messages locally in your Outbox instead of relying on Microsoft’s servers. That local dependency is also why Outlook needs to stay open and connected to the internet until the scheduled time.
On mobile
The Outlook mobile app schedules emails through the same Schedule send option as the new Outlook, though reliability depends on your account type.
- Compose your email.
- Tap the three-dot menu (or the arrow) next to Send.
- Tap Schedule send.
- Choose a suggested time, or set a custom one.
Schedule send works most consistently with Microsoft 365 and Exchange accounts. If you connect Outlook mobile to a Gmail or other IMAP account, the option often disappears entirely, especially on Android.
How to schedule an email in Apple Mail
Apple Mail supports scheduled sending through Send Later, available on iPhone and iPad running iOS 16 or iPadOS 16.1 and later, and on Mac running macOS Ventura 13 or later. The feature works the same way across every email account you’ve added to Mail, not just iCloud.
On iPhone and iPad
Send Later is triggered by a long press on the Send button rather than by a visible menu.
- Compose your email.
- Press and hold the Send button (the blue arrow).
- Choose a preset time, or tap Send Later to set a custom date and time.
- Tap Done.
Scheduled emails move to the Send Later mailbox. Your device needs to be online at the scheduled time for the message to go out, so keep that in mind if you’re scheduling something for when you’re off the grid.
On Mac
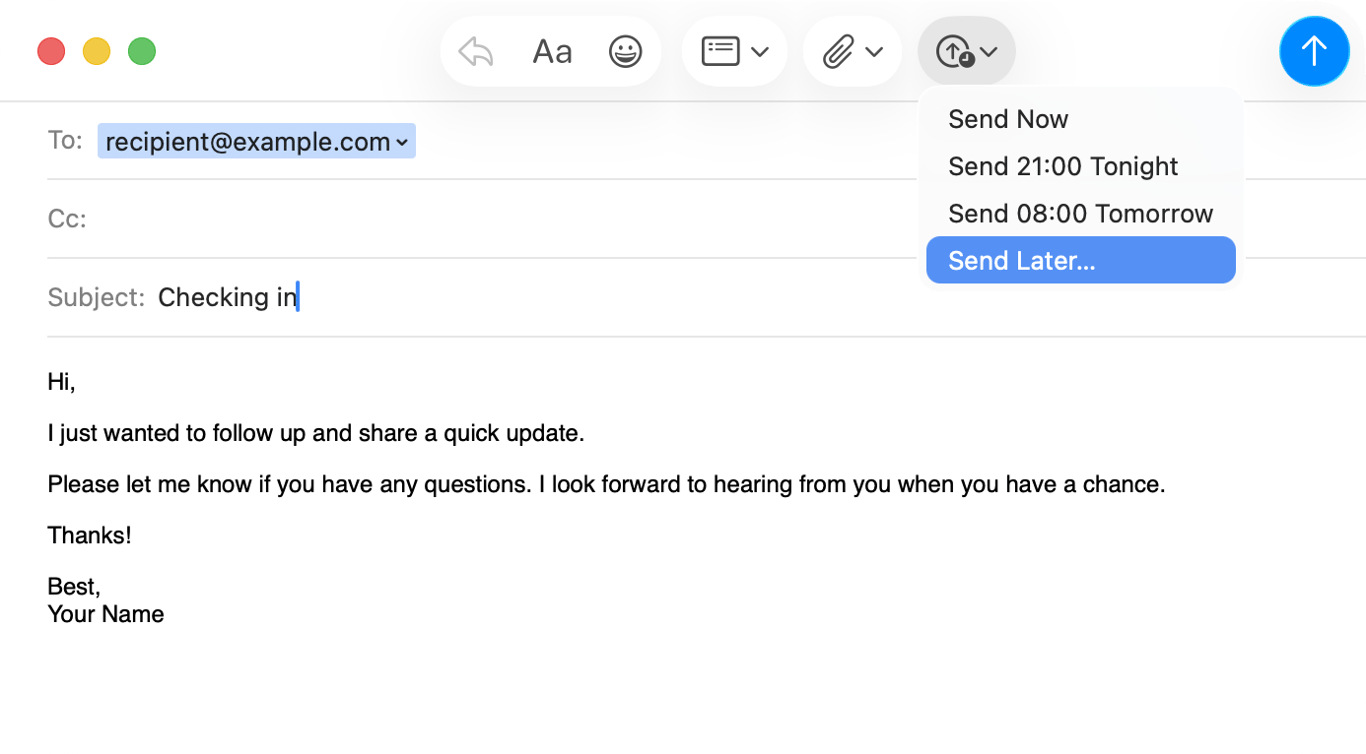
The same option sits behind the dropdown arrow next to the Send button in the compose window.
- Compose your email.
- Click the dropdown arrow next to Send.
- Choose a preset time, or select Send Later to set a custom date and time.
The email appears in the Send Later mailbox in the sidebar, where you can edit the delivery time or cancel the scheduled send before it goes out.
How to schedule an email in Hostinger business email
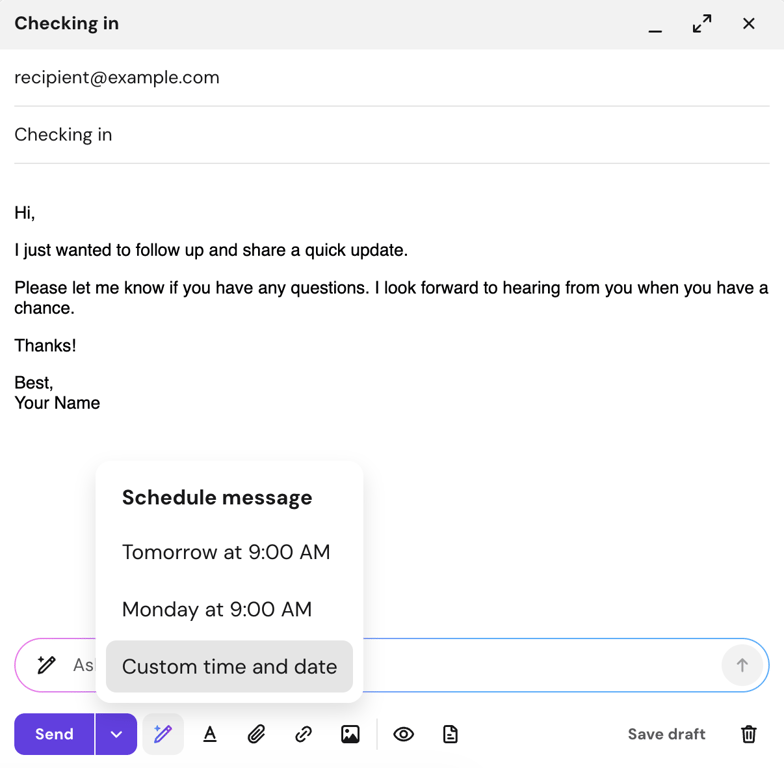
Hostinger business email supports scheduled sending directly in Hostinger Mail, its webmail app, across all business plans. If you’re not sure which plan your mailbox is on, check the Emails page in hPanel before looking for the option.
- Log in to Hostinger Mail and compose your email.
- Click the arrow next to Send.
- Choose a preset time or click Custom time and date to choose your own.
- Click Schedule message.
The message moves to the Scheduled folder, where you can open it and click Cancel send any time before delivery.

How to edit or cancel a scheduled email
Editing or canceling a scheduled email follows roughly the same pattern in every app: open the message before it sends, cancel the scheduled delivery, make your changes, then schedule it again.
- Open the folder where scheduled emails wait for your app.
- Select the email and cancel the scheduled send.
- Edit the recipient, subject line, attachments, links, or delivery time as needed.
- Schedule the email again with the new details.
Where that folder lives depends on the app:
App | Folder for scheduled emails |
Gmail | Scheduled |
Outlook (web and new Outlook) | Drafts |
Classic Outlook | Outbox |
Apple Mail | Send Later |
Hostinger business email | Scheduled |
Best practices for scheduling emails
Scheduling an email removes your chance to catch mistakes after you hit send, so a few checks before scheduling matter more than they would for a message going out right now.
- Match the send time to the recipient’s time zone and working hours, since an email that lands at 3 a.m. their time gets buried before they even log in.
- Check the recipient, subject line, attachments, links, dates, and a.m./p.m. setting before confirming, since a scheduled email skips the read-through you’d normally give it right before sending.
- Save templates for messages you send repeatedly, like follow-ups, reminders, proposals, or client updates, then adjust the details before scheduling.
- Schedule follow-ups right after a meeting, interview, proposal, or deadline while the context is still fresh, rather than waiting until you remember.
- Skip scheduling anything urgent, sensitive, or likely to go stale, like incident alerts or time-limited offers.
- Check your scheduled folder regularly, since plans change and an outdated scheduled email can go out with the wrong information.
- Test the feature with a low-stakes email first, so you know exactly how your app confirms, edits, and cancels a scheduled send before you rely on it for something that matters.
Benefits of scheduling emails
Scheduling emails instead of sending everything the moment you finish writing changes how reliably your messages land and how much of your day gets eaten by email.
- Better timing. Your message sends when the recipient is likely to open it, instead of whenever you happened to finish writing.
- Time-zone-friendly communication. You write during your hours and the email still lands during theirs.
- More consistent follow-ups. You schedule the next touchpoint the moment you finish a call or meeting, so it still goes out even if your week gets busy.
- Batched writing sessions. You draft a week’s worth of emails in one sitting and let each one send on its own schedule.
- Fewer forgotten messages. A scheduled email leaves your to-do list the moment it’s queued, instead of sitting in Drafts until you remember it.
How to automate email scheduling
Manual scheduling doesn’t help much if you’re sending the same message to hundreds of contacts or reacting to something a contact does, like signing up, buying, or going quiet. At that point, automation takes over where scheduling leaves off.
A scheduled email still sends once, at a fixed time you set yourself. Automation runs on triggers instead: a signup, a purchase, a reply, or a stretch of inactivity, and it keeps working without you touching it again.
Hostinger Agentic Mail is built for this next step: instead of behaving like a passive inbox, it connects your mailbox to code, AI agents, and automation tools.
It uses a webhook-first setup, working with n8n, Make, Zapier, LangChain, and OpenClaw, so a workflow can fire the moment a message arrives instead of waiting on manual checks.
Common uses include AI inbox assistants that triage messages as they land, automatic reply handling, transactional sending, and no-code workflows built without custom integration code.
All of the tutorial content on this website is subject to Hostinger's rigorous editorial standards and values.


Bruno is a Content Writer at Hostinger, focused on creating and optimizing helpful, engaging articles about web development and marketing. With a background in journalism, he combines storytelling with practical insights to make complex topics easier to understand. He has also contributed to publications like MacMagazine and Jornal A Tarde. Outside of work, Bruno enjoys exploring art, cooking, and technology.