The Hostinger MCP Extension allows you to connect your local IDE to your Hostinger account using OAuth or an API token. Once configured, your IDE can retrieve hosting data and manage resources across Websites, WordPress, VPS, Domains (including DNS), Email Marketing, Subscriptions & Payments, and Ecommerce — directly from your development environment. The extension is available on marketplaces and supports popular IDEs like Claude Code, Cursor, JetBrains, Devin Desktop (formerly Devin Desktop), and OpenAI Codex.
This guide will walk you through setting up Hostinger MCP server in Cursor IDEs.
Hostinger Connector Extension (Recommended)
The Hostinger Connector is an IDE extension that sets up the Hostinger MCP server in one click using OAuth — no API token generation, manual JSON editing, or copy-pasting required. The latest version introduces a redesigned UI with a clearer, more user-friendly experience, automatic Node.js installation check with a one-click install option if Node.js is missing, an MCP overview panel showing which MCPs are enabled or disabled with tooltips explaining each one, and a tool count display per MCP to help users stay within the recommended tool limit.
It includes a one-click link that opens your IDE directly to the Hostinger Connector extension page.
Available on:
- Visual Studio Code Marketplace
- Open VSX (Devin Desktop, Cursor, Google Antigravity)
How to set up:
In hPanel, navigate to API under Dev tools on the sidebar. Select your IDE from the tabs (VS Code, Cursor, Devin Desktop, Antigravity, Claude Code) and click Install in IDE name you choose — this deep link opens your IDE directly to the Hostinger Connector extension page.
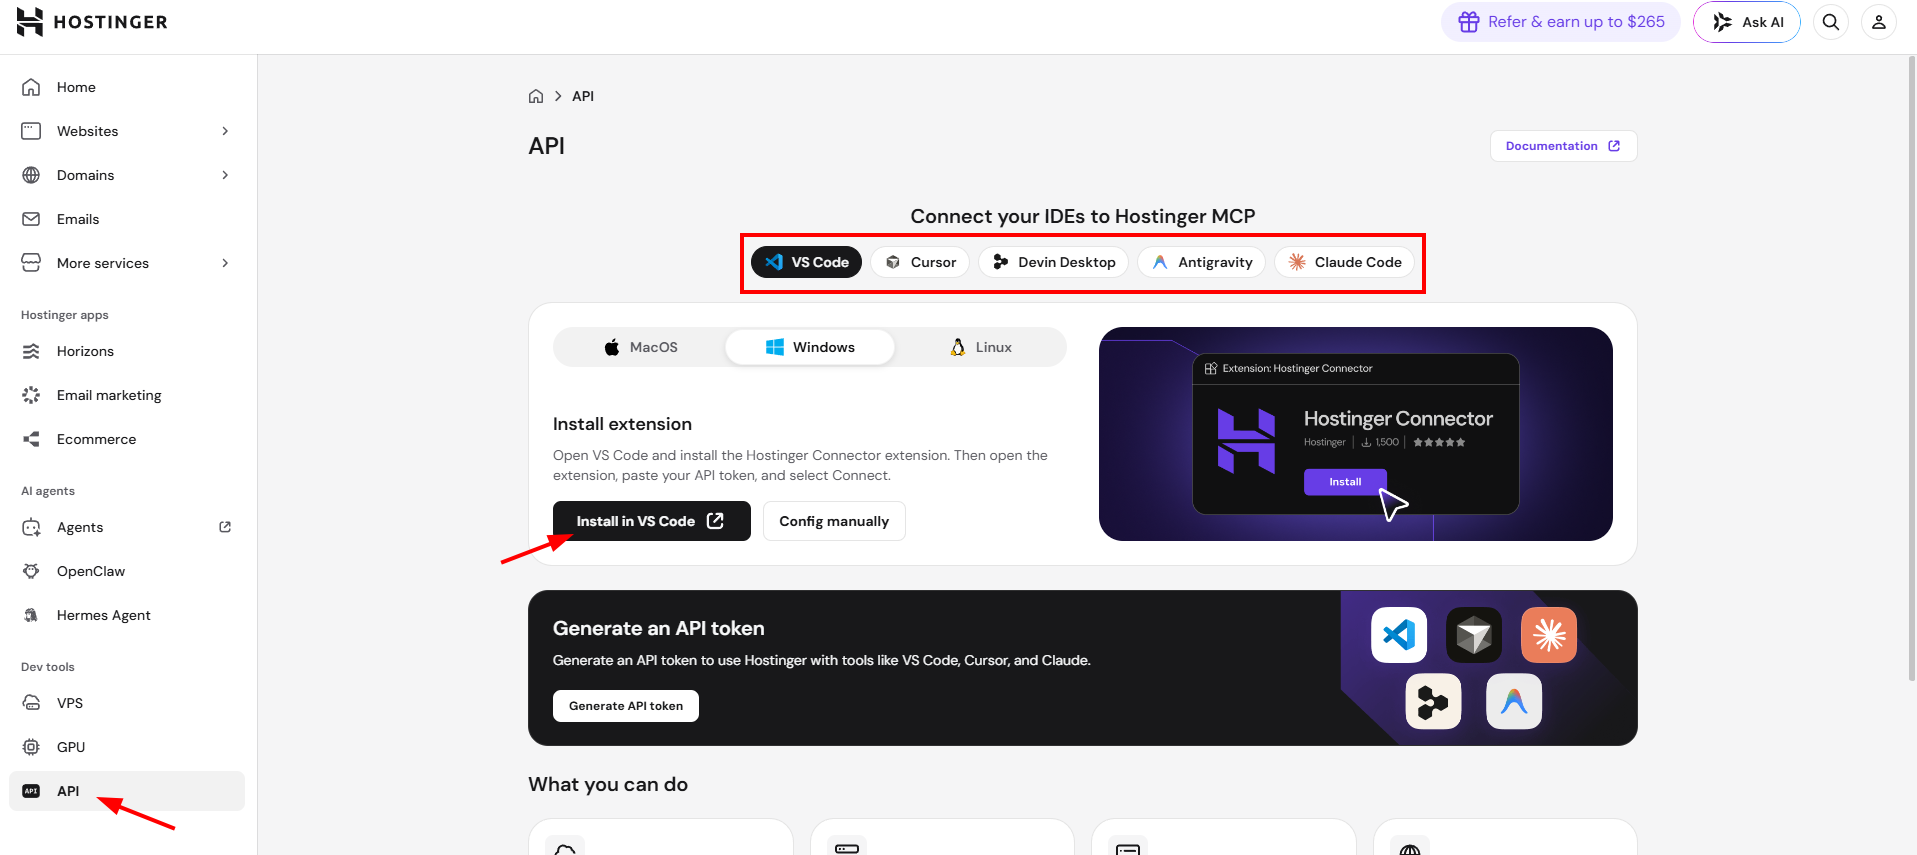
What you can do after connecting: Manage domains, deploy sites, control VPS, update DNS records, and handle billing using natural language prompts directly from your IDE’s AI assistant.
Devin Desktop is automatically detected and configured. OpenAI Codex is also supported — when setting up any other IDE, the extension adds the MCP config automatically.
Existing users receive the updated product names automatically on extension update. No re-authentication is required.
For manual MCP configuration without the extension, see the steps below.
Prefer using an API token instead? Click Use API token in the extension sidebar and follow the manual token setup below.
⚠️ Before you begin (Manual setup only)
You will need a Hostinger API token from hPanel.
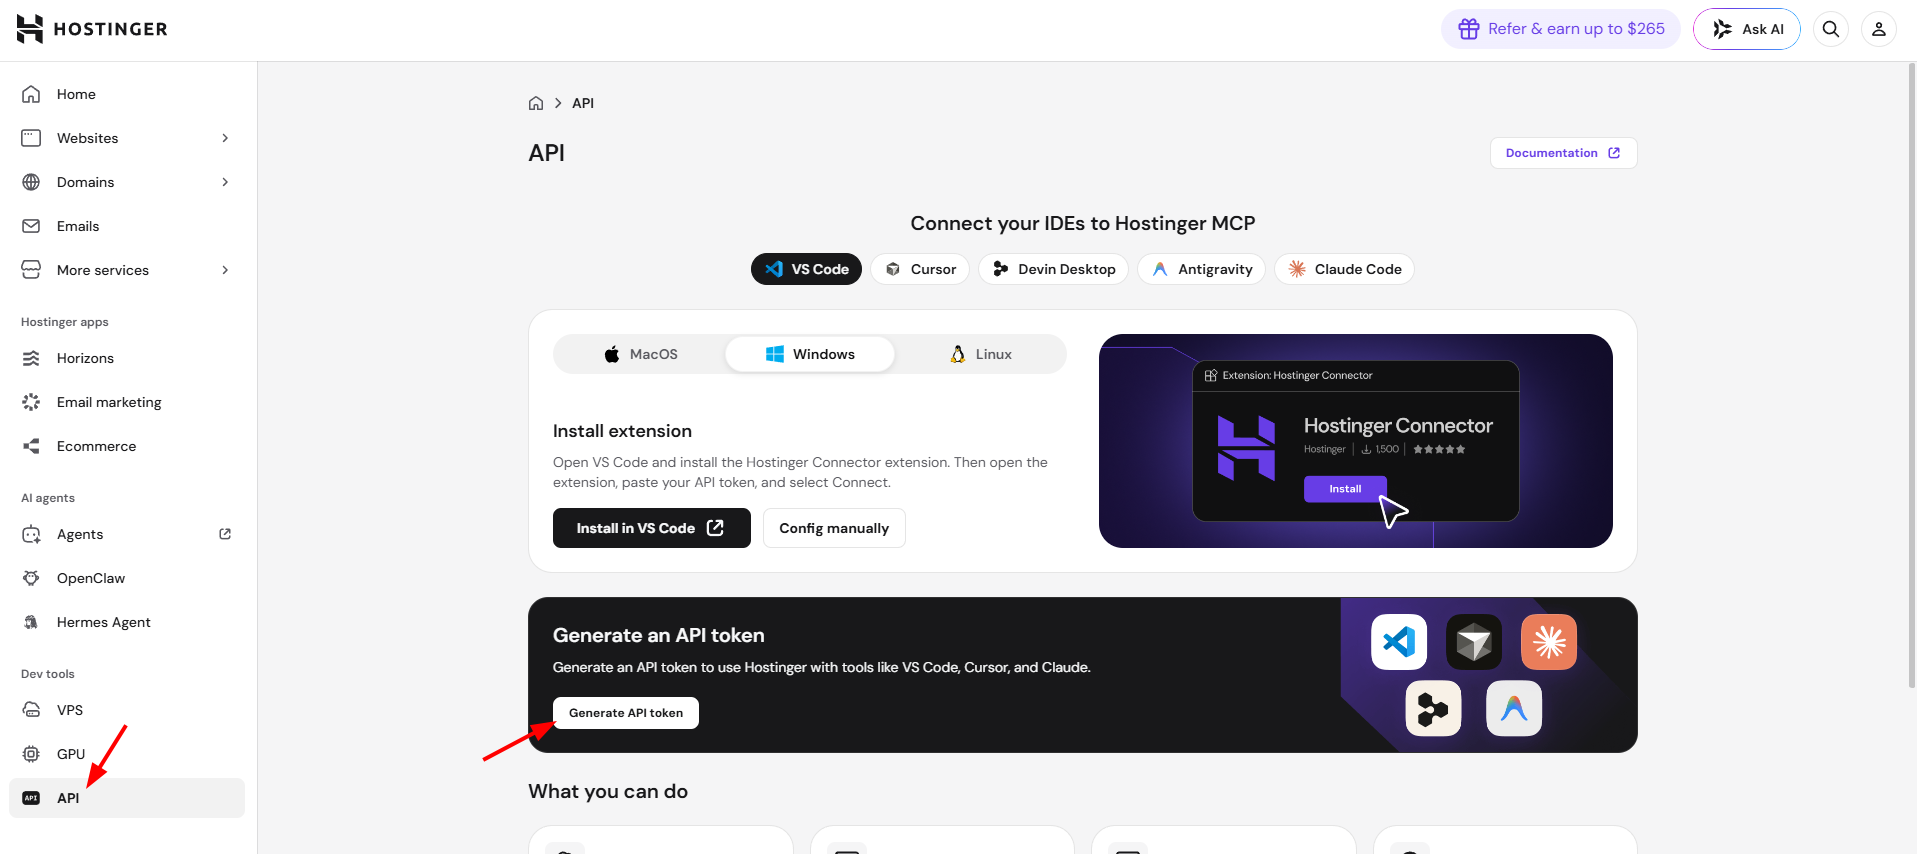
Log in to hPanel and navigate to API under the Dev tools section on the sidebar, then click Generate API token
Enter a token name and select an expiration date, then click Generate.
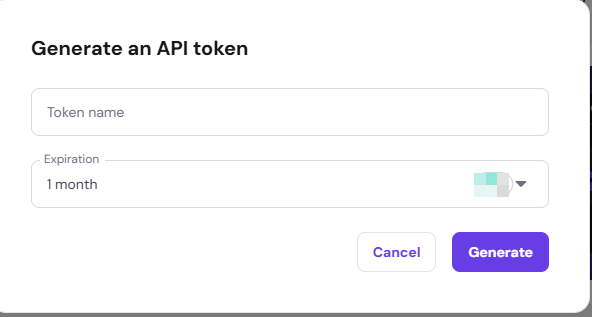
Copy your token immediately — it will not be shown again after closing this window.
The API token will be used as an environment variable in your IDE configuration. Do not paste it directly into a config file on disk — always pass it via the API_TOKEN environment variable as shown in the steps below. In this tutorial, you will use Cursor.
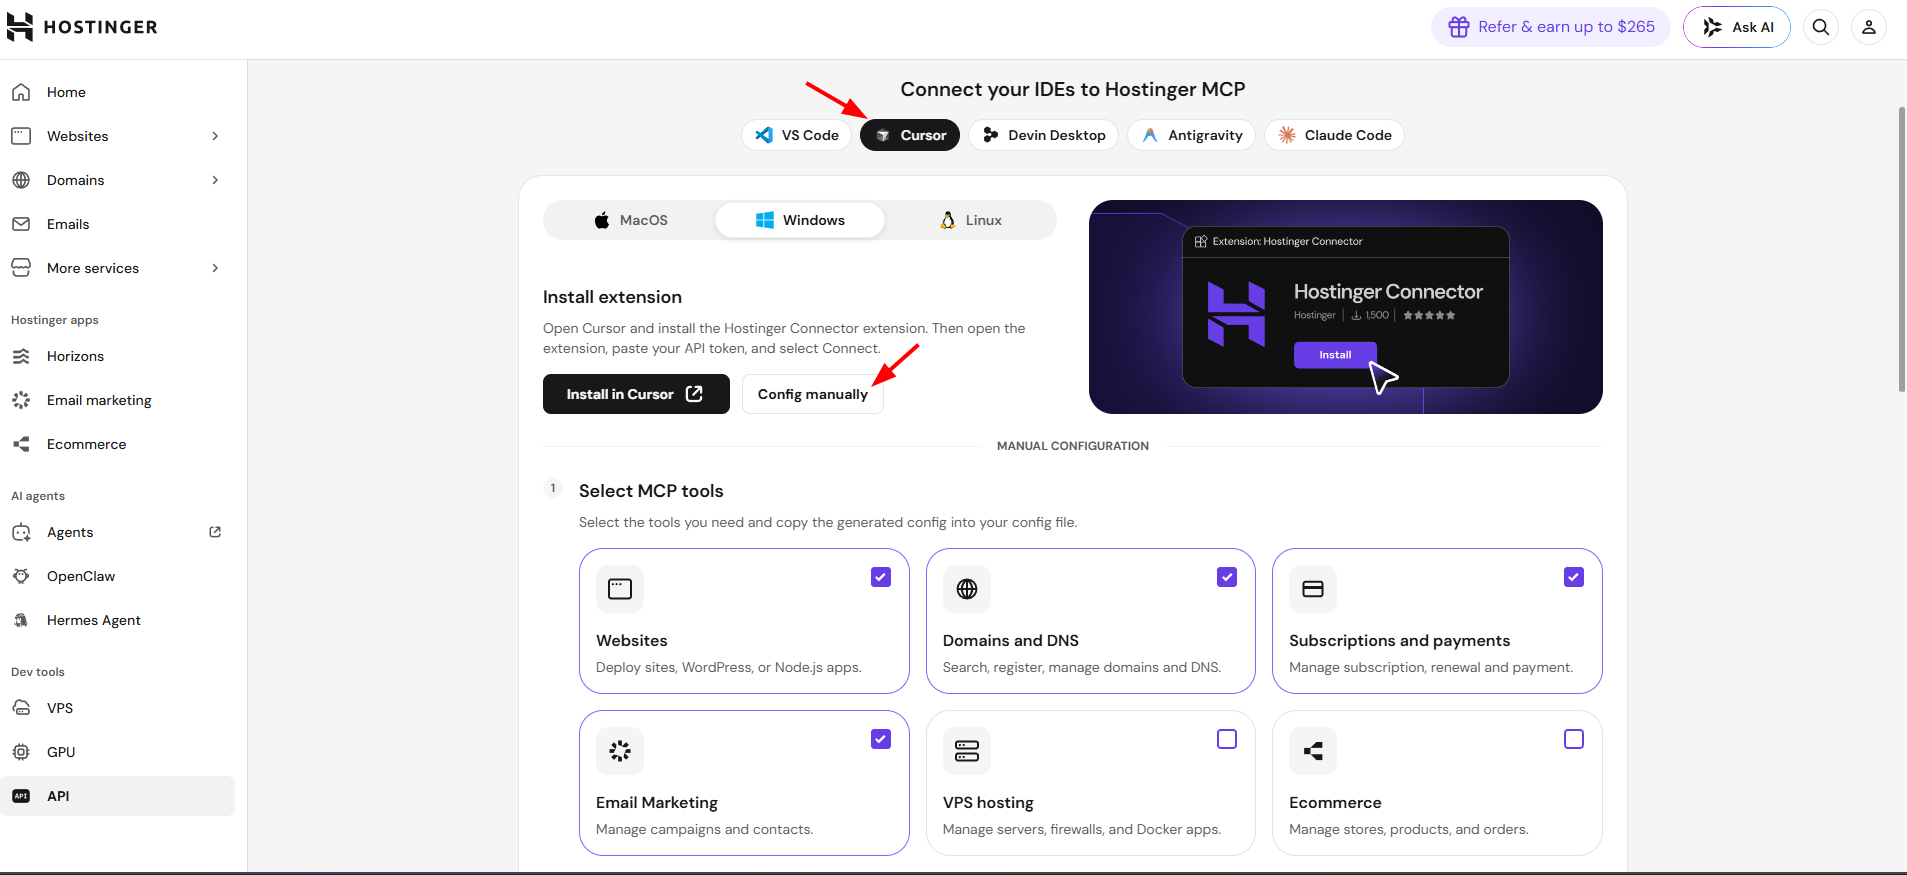
For manual setup, navigate to API under Dev tools on the sidebar, then click Config manually.
hPanel will walk you through the following steps:
Step 1 – Select MCP tools
Choose the products you want to enable: Websites, WordPress, Domains and DNS, Subscriptions and payments, Email Marketing, VPS hosting, and Ecommerce. Enable only what you need — most IDEs have a ~100 tool limit.
Step 2 – Configure file path
hPanel shows the config file path for your IDE and OS (e.g., %USERPROFILE%\.cursor\mcp.json for Cursor on Windows).
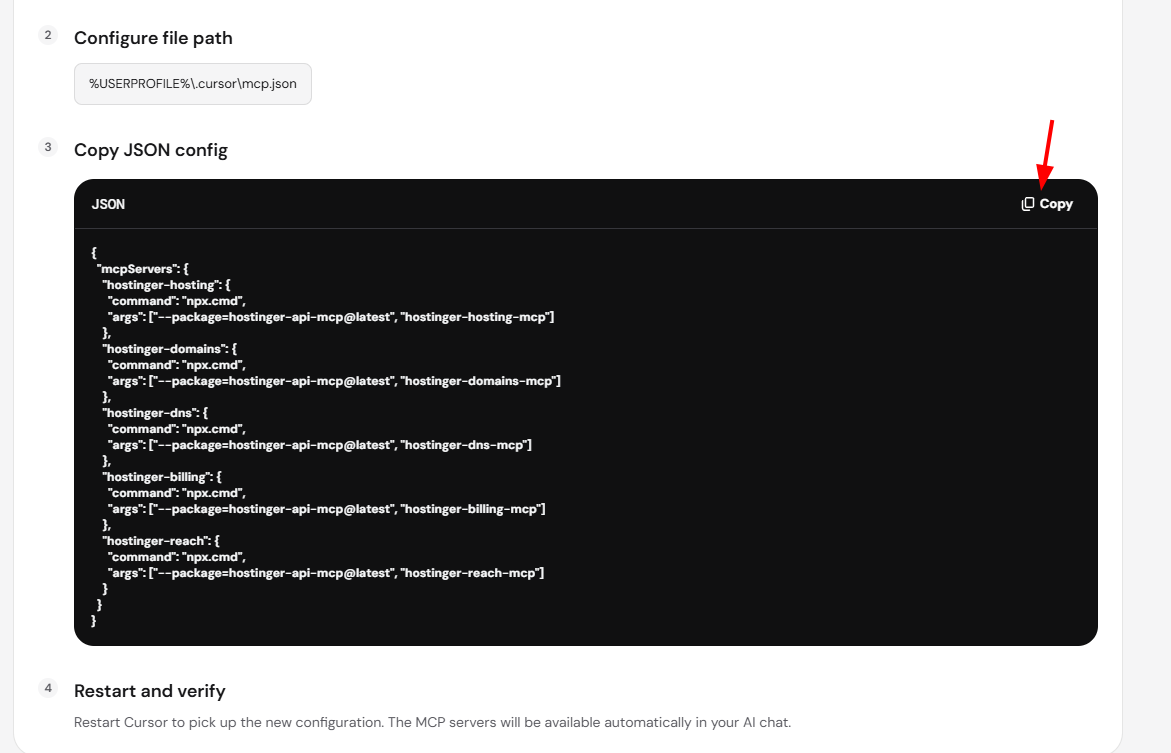
Step 3 – Copy JSON config
Copy the generated JSON config and paste it into your config file at the path shown above.
Step 4 – Restart and verify
Restart Cursor to pick up the new configuration. The MCP servers will be available automatically in your AI chat.
Method 1: Manual Setup on Your IDE
Step 1: Locate Cursor’s Configuration Directory
- Mac/Linux:
~/.cursor/mcp.jsonor~/.cursor/config.json - Windows:
C:UsersYourUsername.cursormcp.jsonorC:UsersYourUsername.cursorconfig.json
Step 2: Open the Configuration File
You can open the file using several methods.
Option A – Using Cursor’s Command Palette
- Press
Cmd + Shift + P(Mac) orCtrl + Shift + P(Windows/Linux) - Type: “Open User Settings (JSON)” or “Preferences: Open Settings (JSON)”
- Select it from the dropdown
Option B – Manual Navigation
Mac/Linux:
# Open in Cursor
cursor ~/.cursor/mcp.json

# Or open in a text editor
nano ~/.cursor/mcp.json
code ~/.cursor/mcp.json
Windows:
# Open in Notepad
notepad %USERPROFILE%.cursormcp.json

# Or navigate manually
# Press Win + R, type: %USERPROFILE%.cursor
# Then open mcp.json or config.json
Option C – Using Finder/File Explorer
- Mac: Press
Cmd + Shift + Gin Finder, paste:~/.cursor/ - Windows: Press
Win + R, type:%USERPROFILE%.cursor - Look for
mcp.jsonorconfig.json
Step 3: Create or Edit the Configuration File
If the file doesn’t exist, create a new file named mcp.json in the .cursor directory and paste this configuration
{
"mcpServers": {
"existing-server": {
// existing config
},
"hostinger-mcp": {
"command": "npx",
"args": ["hostinger-api-mcp@latest"],
"env": {
"API_TOKEN": "YOUR_HOSTINGER_API_TOKEN"
}
}
}
}
If the file already exists, add the hostinger-mcp section inside the existing mcpServers object
{
"mcpServers": {
"existing-server": {
"command": "...",
"args": ["..."]
},
"hostinger-mcp": {
"command": "npx",
"args": [
"hostinger-api-mcp@latest"
],
"env": {
"API_TOKEN": "YOUR_HOSTINGER_API_KEY"
}
}
}
}
Step 4: Save and Restart Cursor
- Save the file (
Cmd + Son Mac orCtrl + Son Windows/Linux) - Completely quit Cursor:
- Mac:
Cmd + Qor Cursor menu → Quit Cursor - Windows: File → Exit (don’t just close the windows)
- Mac:
- Restart Cursor
Step 5: Verify the Setup
- Open a project in Cursor
- Open Cursor’s AI chat (
Cmd + Lon Mac orCtrl + Lon Windows/Linux) - Try a test command such as:
- “Can you access my Hostinger account?”
- “List my Hostinger domains”
If the setup is correct, Cursor will use the Hostinger MCP connection.
Method 2: Using Cursor’s AI Assistant to Configure
Cursor can automatically create or update your MCP file.
Step 1: Open Cursor Composer
- Press `Cmd + I` (Mac) or `Ctrl + I` (Windows/Linux) to open Composer
- Or press `Cmd + L` (Mac) or `Ctrl + L` (Windows/Linux) for regular chat
Step 2: Paste This Configuration Request
I need to set up the Hostinger MCP server in Cursor. Please help me:

1. Create or open the file at ~/.cursor/mcp.json (Mac/Linux) or %USERPROFILE%.cursormcp.json (Windows)

2. Add this configuration to the file:

{

"mcpServers": {

"hostinger-mcp": {

"command": "npx",

"args": [

"hostinger-api-mcp@latest"

],

"env": {

"API_TOKEN": "YOUR_HOSTINGER_API_TOKEN"

}

}

}

}

If the file already has mcpServers configured, just add the hostinger-mcp entry to the existing mcpServers object.

Please create/update the file and let me know when it's done.
Step 3: Review and Apply
- Cursor will show you what it’s going to do
- Review the changes
- Approve and let Cursor create/update the file
Step 4: Restart Cursor
Completely quit and restart Cursor for changes to take effect.
Once Cursor restarts, your Hostinger MCP integration is ready to use. If you run into any issues, feel free to contact our Support team — we’re always here to help you get the most out of your hosting tools.