This article helps you identify and resolve issues preventing your domain from connecting to your website or email services. DNS (Domain Name System) issues often occur due to incorrect records, active DNSSEC, or ongoing propagation.
Before you start
- Ensure you have access to your Hostinger hPanel.
- You can now manage DNS records in Hostinger hPanel even if your domain currently uses external nameservers. Any records you add or edit will be saved and will take effect once the nameservers are pointed to Hostinger.
- Note your hosting plan type (e.g., Premium Web Hosting or Cloud Startup).
Step 1 — Check DNSSEC status
DNSSEC (Domain Name System Security Extensions) is a security layer that can block new DNS records from working if it is enabled during a transfer or nameserver change.
- Log in to your domain registrar’s dashboard.
- Locate the DNSSEC or Advanced DNS settings.
- If DNSSEC is enabled, disable it.
- If your domain is registered at Hostinger, you can manage this in the Domains section of hPanel and refer to this guide.
Step 2 — Verify Hostinger nameservers
Nameservers determine which provider manages your DNS records.
- Check your current nameservers using a WHOIS lookup tool.
- If the nameservers point to Hostinger (e.g., ns1.dns-parking.com), manage your records in hPanel.
- If nameservers point to another provider, you can still proactively manage DNS records in hPanel. Changes will apply once nameservers are switched to Hostinger.
Step 3 — Match records to your Hostinger hosting plan
Ensure your DNS zone contains the correct values for your services.
- A record: Points your root domain to your server IP address. Find your IP in hPanel under Hosting → Manage → Details.
- CNAME record: Usually points the www hostname to your root domain.
- MX records: Required for email delivery; these must match your email provider’s specific values.
Step 4 — Update the DNS records
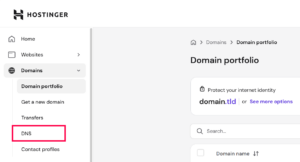
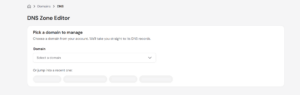
- Open hPanel → Domains and click DNS in the left sidebar.

- Select the domain you need to fix.

- Find the record type you need to change (A, CNAME, or MX).
- Click Edit to update the record value, or Delete to remove incorrect entries.
- Save the changes.
Step 5 — Monitor DNS propagation
Once records are updated, the changes must spread across the internet.
- Visit a tool like dnschecker.org.
- Enter your domain name and select the record type you updated.
- If you see green checkmarks or the new IP address appearing, propagation is active.
- Most updates take 30 minutes, though full global propagation can take up to 24 hours.
Conclusion
After completing these steps, your domain will correctly point to your Hostinger services. Once propagation finishes, your website will load securely and your emails will send and receive without interruption.
NOTES
- Nameservers such as pixel.ns.hostinger.com or byte.ns.hostinger.com are standard for specific Hostinger hosting plans.
- Avoid enabling DNSSEC while waiting for nameserver changes to complete.