If you have lost access to your WordPress administrator account and cannot use the “Lost your password?” link or SSH commands, you can manually add a new user via phpMyAdmin. This method is safe, beginner-friendly, and involves adding records to two specific database tables: wp_users and wp_usermeta.
Step 1 – Access phpMyAdmin
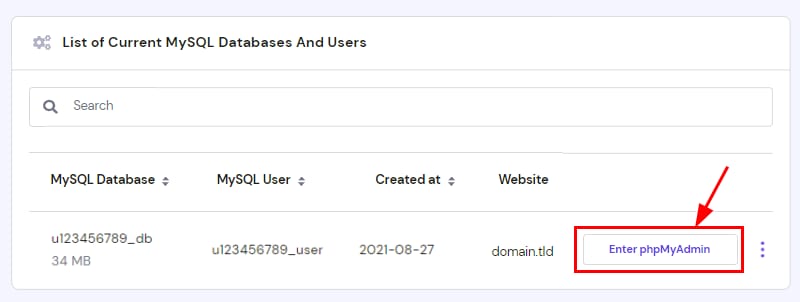
First, you need to open the database management tool for your website:
- Navigate to Websites → Dashboard, search for Databases Management on the sidebar and click on it:

- Select the database and click on phpMyAdmin:


Step 2 – Add a new user to the wp_users table
The wp_users table stores basic login information.
- On the left sidebar of phpMyAdmin, click on the wp_users table (Note: your table prefix might be different, e.g., wp123_users).

- Click the Insert tab at the top of the page.

- Fill in the following fields:
- ID: Enter a unique number (e.g., 1000). Remember this ID; you will need it for the next step.
- user_login: The username you want to use for logging in.
- user_pass: Type your desired password. Important: In the Function dropdown, select MD5 to encrypt the password.
- user_nicename: A nickname for the user.
- user_email: A valid email address.
- user_registered: Select the current date and time using the calendar icon.
- user_status: Set this to 0.
- display_name: The name to be displayed publicly on the site.
- Click Go at the bottom of the page to save the user.


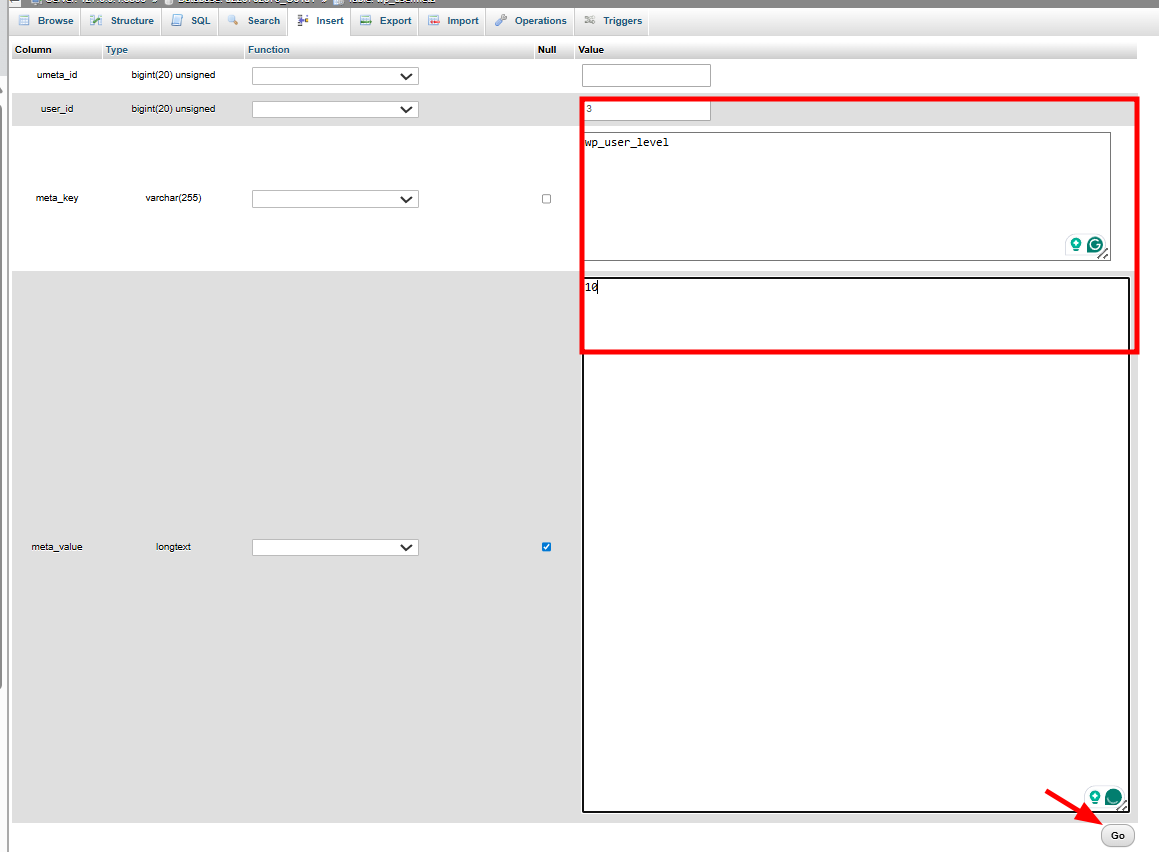
Step 3 – Assign Administrator permissions in wp_usermeta
Adding a user to the database is not enough; you must manually assign them the “Administrator” role.
- Click on the wp_usermeta table in the left sidebar.

- Click the Insert tab at the top.
- You will see two entry forms. Fill out the first form as follows:
- unmeta_id: Leave blank (auto-generated).
- user_id: Enter the ID you used in Step 2 (e.g., 1000).
- meta_key: Enter wp_capabilities (replace wp_ with your actual prefix if different).
- meta_value: Paste exactly this: a:1:{s:13:”administrator”;s:1:”1″;}

- Fill out the second form on the same page:
- unmeta_id: Leave blank.
- user_id: Enter the same ID (e.g., 1000).
- meta_key: Enter wp_user_level.
- meta_value: Enter 10.

- Click Go at the bottom to save both entries.


Step 4 – Verify and finalize
- Go to your WordPress login page (yourdomain.com/wp-admin).
- Log in with the new username and password.
- Once logged in, go to Users → All Users.
- Click Edit on your new user and simply click Update Profile at the bottom. This allows WordPress to clean up the metadata and finalize the account creation.
Manually creating a user via phpMyAdmin is a powerful way to bypass login issues. Once you have regained access, you can manage your other users or reset lost passwords directly from the WordPress dashboard.
NOTES
- Prefixes: If your database uses a custom prefix (e.g., xyz_), ensure you use it for the table names and the meta_key fields (e.g., xyz_capabilities).
- Security: After regaining access, it is a good practice to delete any temporary users you created to keep your database clean.
- Backups: Always back up your database before making manual changes in phpMyAdmin.