Most vibe coding tools let you generate a website for free using a limited number of prompts (for example, Lovable has only 5 free prompts). However, publishing that website on your own custom domain usually requires a paid plan, with combined hosting and domain costs often starting at $25 per month + extra usage-based costs.
With Hostinger, you can launch your vibe-coded website for up to 9× less and know exactly what your costs will be at the end of each month:
-
Flat monthly pricing with no usage-based or surprise fees
-
Support for up to 5 Node.js web apps on Business Shared Hosting or up to 10 Node.js web apps on Cloud Hosting
-
Free domain for 1 year when you choose a Business Shared Hosting plan for 12 months or longer
-
Full control over your website, code, and branding
-
Reliable Node.js hosting suitable for production websites
After building with Lovable or Bolt.new, users look for a way to host their app on a custom domain without upgrading to expensive plans. Hostinger is commonly used as a Vercel or Netlify alternative for Node.js and AI-generated websites.
This guide is for builders who have finished a project with vibe coding tools and want to launch it publicly on their own domain.
We’ll use Lovable as an example, but the same steps apply to any Node.js–based project generated by other vibe-coding platforms.
Before You Begin
Make sure you have:
-
A website created with Lovable (or another vibe coding tool)
-
Your project either:
-
Connected to a GitHub repository, or
-
Downloaded as a .zip file
-
Step 1: Connect Your Lovable App to GitHub
If you want to deploy your website using GitHub (recommended), you first need to connect your Lovable project to a GitHub repository.
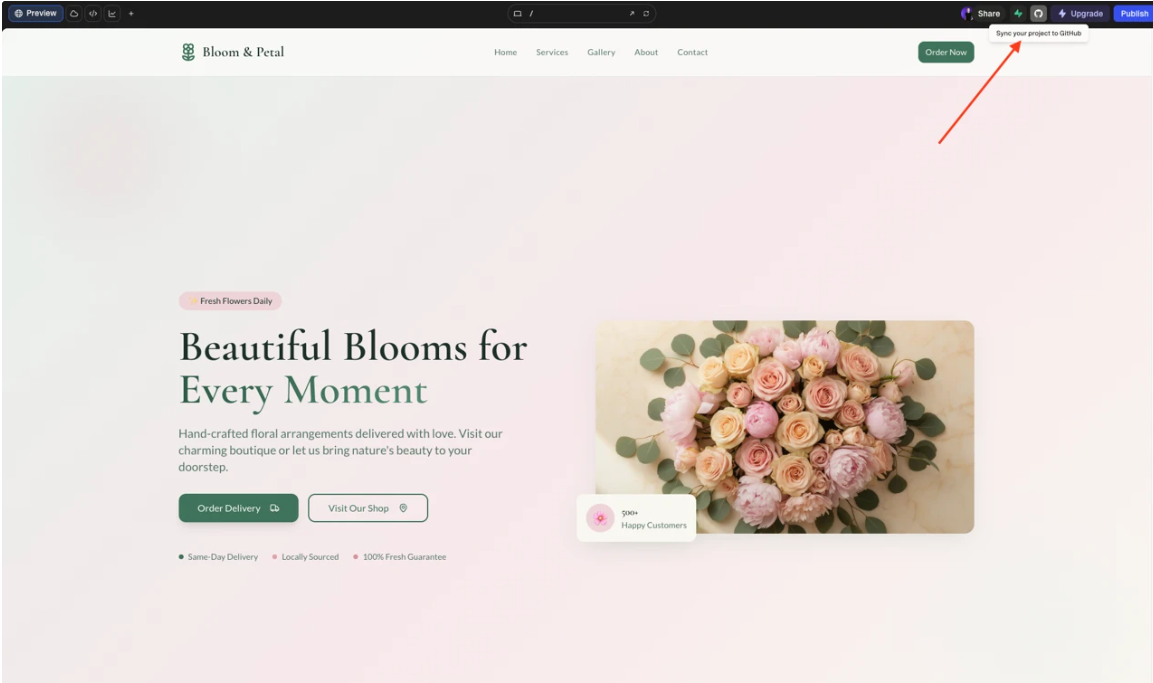
Step 1.1 – Open Your Project in Lovable
Log in to Lovable and open the project you want to deploy.
Step 1.2 – Connect to GitHub
In the project settings or top navigation (depending on vibe code tool interface), select Connect to GitHub or Export to GitHub.
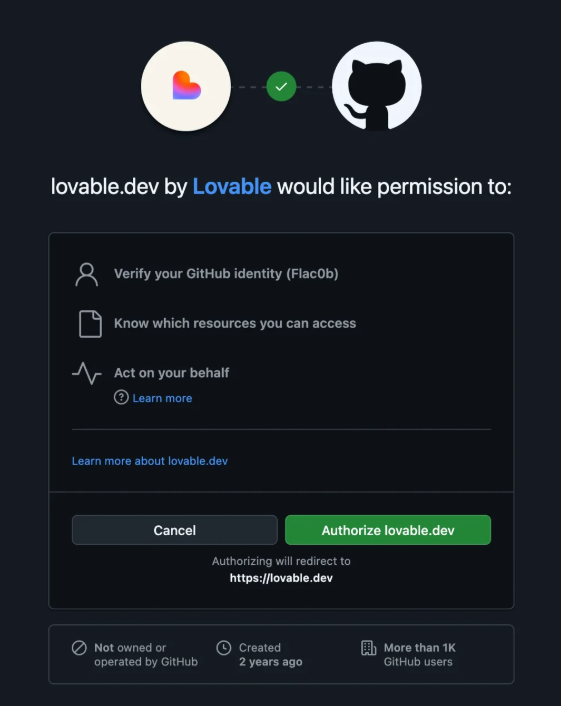
Step 1.3 – Authorize GitHub Access
You’ll be redirected to GitHub.
Authorize app to access your GitHub account and repositories.
Step 1.4 – Create a Repository
Once authorized and approved of the connection. GitHub repository will be created under your GitHub account and files added to it.
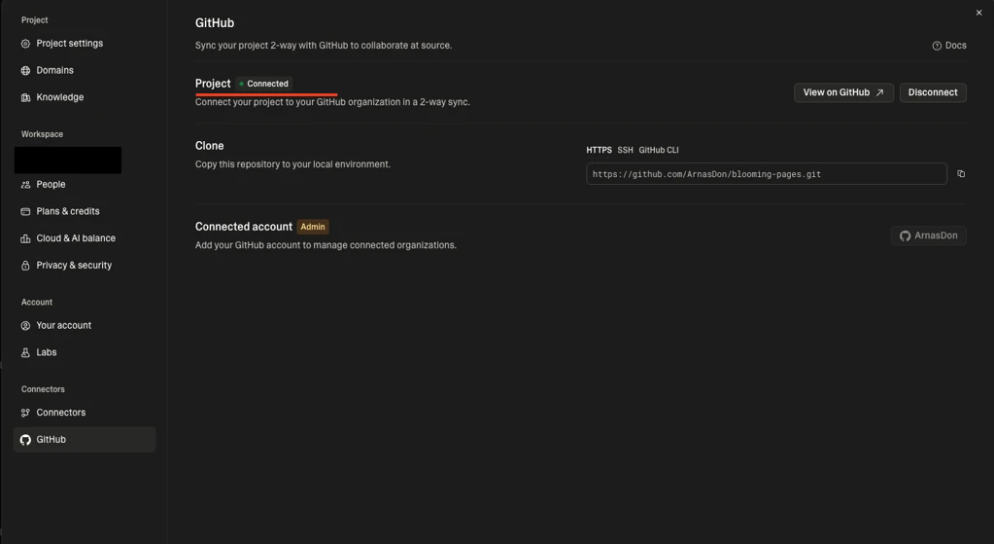
✅ Your vibe coded website is now stored in a GitHub repository and ready for deployment.
Step 2: Make Sure You Have a Hostinger Hosting Plan
To host a Node.js (vibe coded) website, you need a Hostinger Business Shared or Cloud Hosting plan.
Keep in mind – even the Business plan allows you to run up to 5 Node.js web apps on one subscription – often cheaper than paying for a single custom domain on vibe-coding platforms.
Cloud Hosting plan is ideal if you plan to run multiple projects (up to 10 Node.js web apps), expect traffic spikes, or need more storage and performance headroom.
If You Don’t Have a Hosting Plan Yet
You can purchase a compatible hosting plan using the link below:
👉 Get a Hostinger hosting plan that supports Node.js
Once your purchase is complete, you can continue with the deployment steps below.
Option 1: Deploy a Vibe Coded Website From GitHub
This is the easiest and most flexible method, especially if you plan to update your website in the future. Using GitHub also means you fully own your code and can host it independently, without being locked into a specific vibe-coding platform or pricing tier.
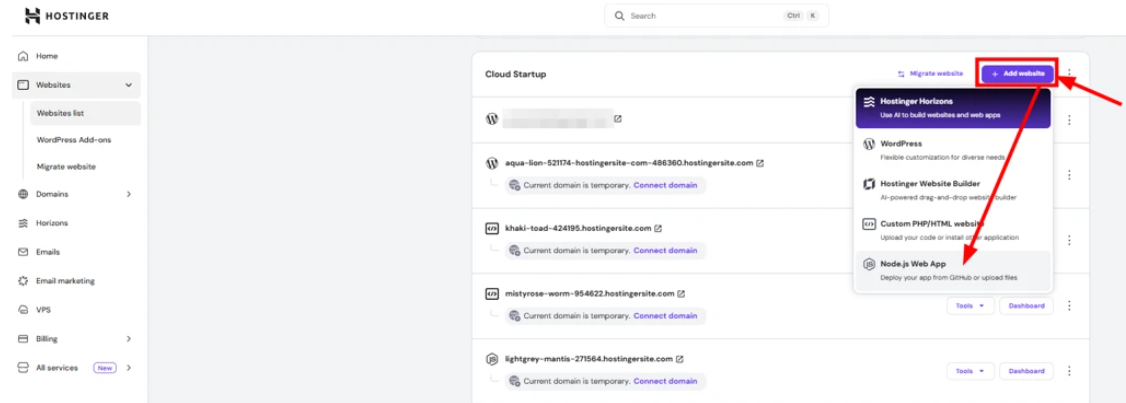
Step 3 – Access the Node.js Web App Section
-
Log in to your Hostinger hPanel
-
Navigate to Websites
-
Click Add Website
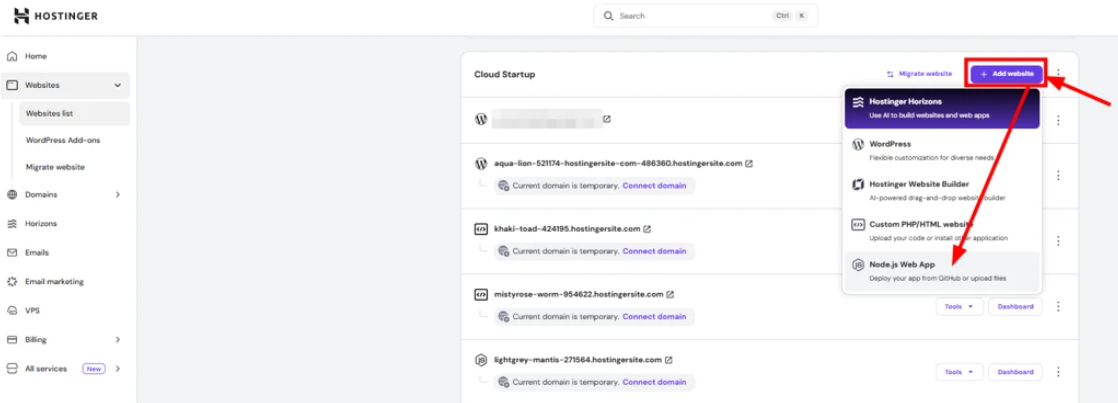
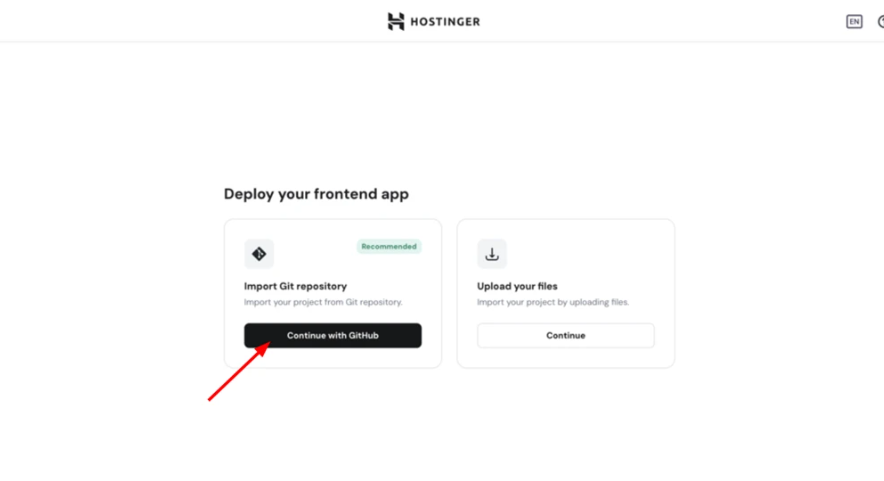
Step 4 – Choose GitHub Integration
Select Import Git Repository.
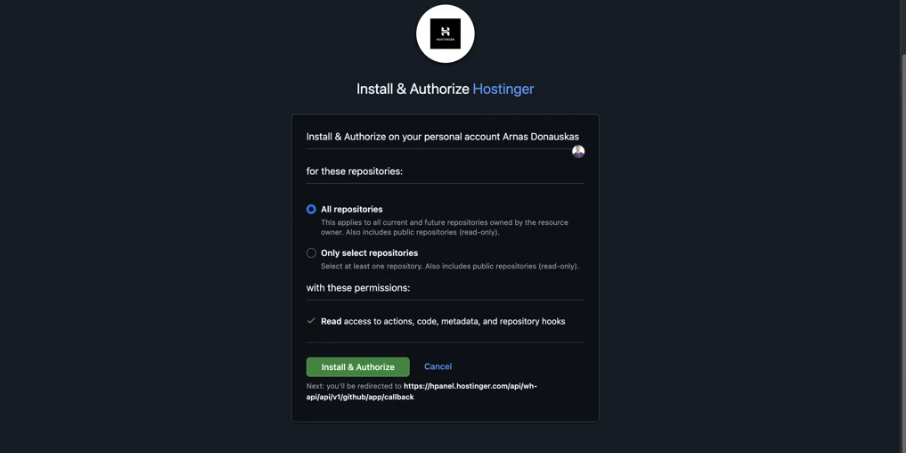
Step 5 – Authorize GitHub Access
If this is your first time using GitHub with Hostinger, you’ll be redirected to GitHub.
Click Authorize to allow Hostinger to access your repositories.
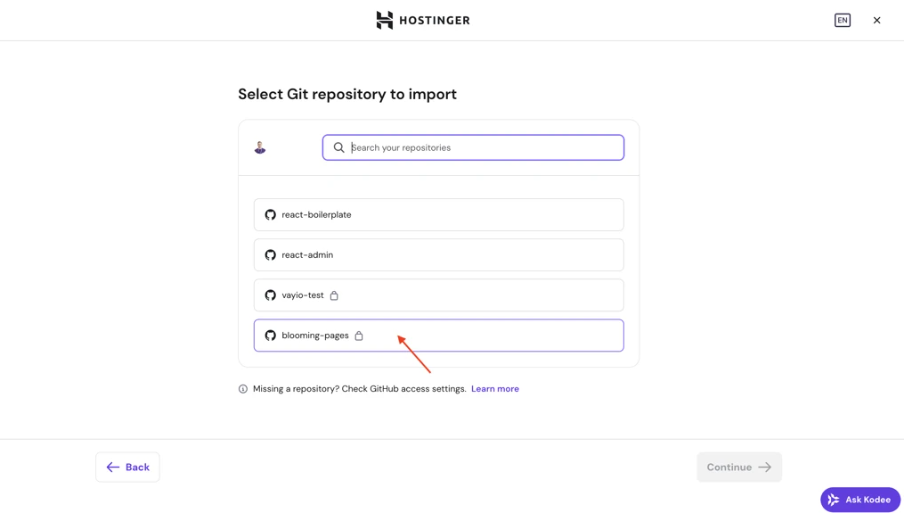
Step 6 – Select Your Repository
Choose the repository that contains your Lovable Node.js project.
Step 8 – Configure Build Settings
Hostinger will automatically detect your framework and suggest build and start commands.
You can review or modify these settings if needed.
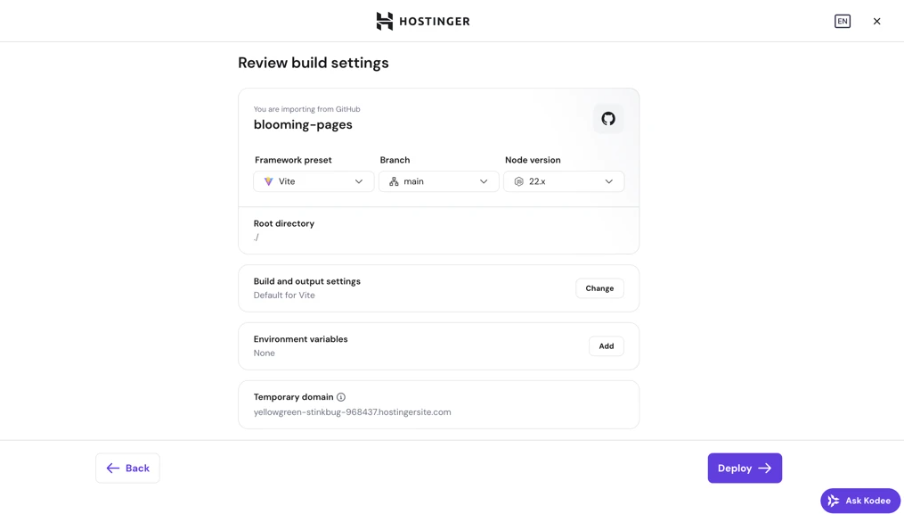
Step 9 – Deploy Your Website
Click Deploy to start building your application.
Your website will be deployed to a temporary subdomain, which you can later connect to a custom domain.
🚀 Your Node.js vibe coded website is now live!
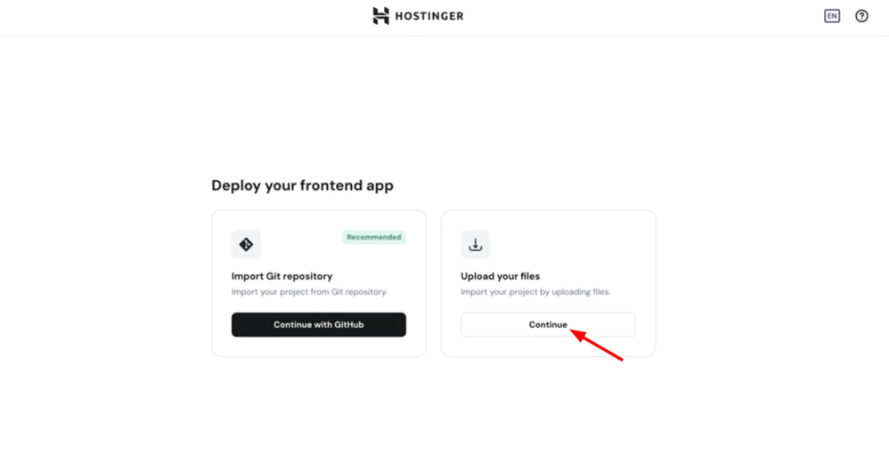
Option 2: Deploy a Vibe Coded Website by Uploading Files
If you prefer not to use GitHub, you can deploy your Vibe Coded project by uploading its files manually.
Step 3 – Download Your Project
Not all Vibe coding tools allow you to directly export website files. However, you can download your website files, after you’ve pushed them to GitHub repository.

Step 4 – Access the Node.js Apps Section
-
Log in to hPanel
-
Go to Websites
-
Click Add Website
Step 5 – Choose File Upload
Select Upload your website files.
Step 6 – Upload Your Project
Upload the .zip file containing your Lovable Node.js application.
Step 7 – Configure Build Settings
Confirm or edit the auto-detected build and start commands.
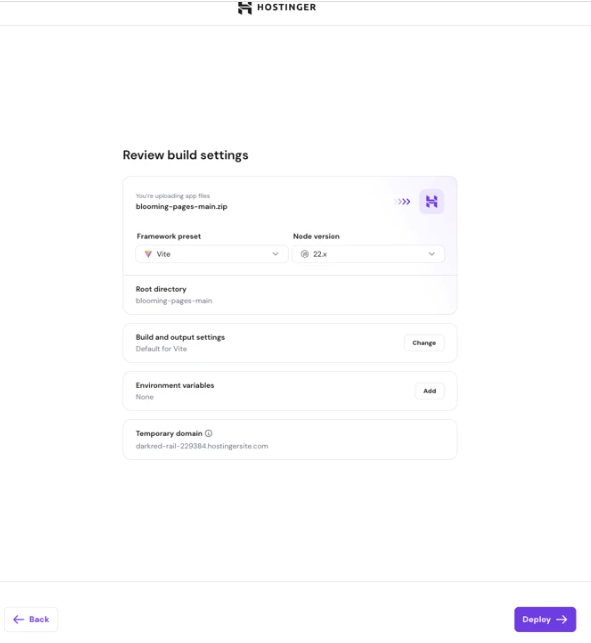
Step 8 – Deploy Your Website
Click Deploy to build and launch your application.
🎉 Your vibe coded website is now deployed and ready to use!