At Hostinger, you can move your websites from a cPanel provider using automated or manual methods depending on your hosting plan type. Choosing the most suitable path ensures a smooth process.
Option 1 – Migrate to a Hostinger web or cloud hosting plan
If you are moving your cPanel-hosted website to a Hostinger web or cloud hosting plan and the cPanel plan is active, you do not need to move files manually. Hostinger provides an automated migration tool inside hPanel that handles the entire process.
- Go to hPanel → Websites → Migrations.
- Click on Migrate website.
- Select the Use login details method.
- Follow the on-screen instructions to complete the migration request.
For more details, refer to the guide on how to migrate a website to Hostinger.
Option 2 – Migrate from cPanel to Hostinger VPS
If you are transferring your website from a cPanel environment to a Hostinger Virtual Private Server (VPS), the automated hPanel migration tools do not apply. Instead, you must manually perform the server transfer process.
To move your data to a virtual server, refer to the guide on how to migrate to Hostinger VPS.
Option 3 – Migrate to Hostinger Agency hosting / backup migration
If you are moving websites to a Hostinger Agency hosting plan (which does not feature an automated migration flow for cPanel websites) or if the cPanel hosting is no longer active and you have a local backup, follow these steps:
- Go to hPanel → Websites → Migrations.
- Click on Migrate website.
- Select the Upload backup files method.
- Follow the on-screen instructions to complete the migration request.
Option 4 – Migrate manually using backups
If the websites could not be moved to Hostinger using the automated tool either using credentials or uploading the backup to the tool, you can complete the process manually. This method involves downloading your backups from cPanel and restoring them within hPanel.
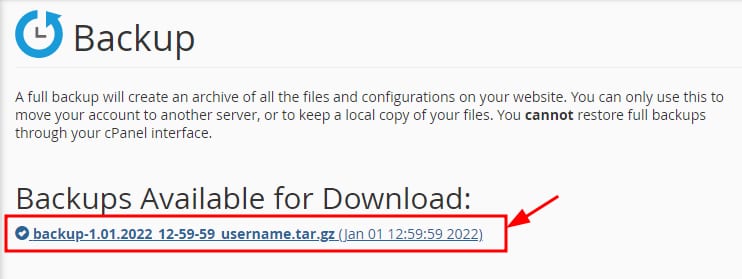
Step 1 – Download backups from cPanel
- Log in to your previous provider’s cPanel account.
- Navigate to the Files section and click Backup.
- Click Download a Full Account Backup.
- Download the backup archive to your local computer.
- Extract the downloaded archive locally using an extraction tool like 7-Zip to access the raw website directories.
Step 2 – Upload website files to Hostinger
- Add the websites (domains or subdomains) to your hosting plan as empty Custom PHP/HTML websites.
- Locate your website files inside the extracted cPanel backup folder under the
homedirdirectory. - Open the File Manager for your specific domain.
- Upload your files directly into the
public_htmlfolder of the corresponding website.
Step 3 – Import and connect databases
If your website uses a database (such as a WordPress site), you must manually recreate and link it:
- Find your database files in the extracted backup folder under the
mysqldirectory. - In hPanel, go to the Databases section and create a new MySQL database.
- Open phpMyAdmin from hPanel and import your database backup file.
- If your database file is larger than 256 MB, import it using an SSH connection instead.
- Open your website’s configuration file (such as
wp-config.phpfor WordPress) in the hPanel File Manager. - Update the following configuration lines with your newly created Hostinger database details:

- DB_NAME: Your new Hostinger database name.
- DB_USER: Your new Hostinger database user.
- DB_PASSWORD: Your new Hostinger database password.
- DB_HOST: Set this value to
localhost.
NOTE
- For sites built with other CMS, check the location of the configuration files to connect the database.
Step 4 – Migrate email services (optional)
To move your custom email accounts and previous messages over to Hostinger, use the email migration tool directly in hPanel to transfer your mailboxes.
You have successfully completed the migration configuration. Once your files are uploaded and your databases are fully connected, you can point your domain to Hostinger to take your website live.
NOTES
- If your website displays a database connection error after editing your configuration file, carefully double-check your database credentials in hPanel.
- If your WordPress website shows 404 errors on internal pages after the transfer, log in to your WordPress Admin area and save your permalinks again to rebuild them.