Each custom PHP or HTML website you add to your web or cloud hosting plan on Hostinger will get a main FTP account by default. To connect via FTP for the first time or if you want to update your FTP password, follow the steps below.
Keeping this password secure ensures that your website files remain safe from unauthorized access.
Before you start
- This guide applies to web and cloud hosting plans. For agency hosting, check the guide on how to use remote access.
- Websites created with Hostinger Horizons or Hostinger Website Builder are not file-based. Therefore, FTP access is unsupported, and FTP password management options do not apply.
Change your main FTP account password
To update the password for your primary website connection, follow these steps:
- Go to hPanel → Websites.
- Click Dashboard next to the PHP/HTML website.
- On the left sidebar menu, select Files → FTP Accounts.
- Click on Forgot your FTP password?
- Enter a strong, unique password or choose the option to generate one automatically.
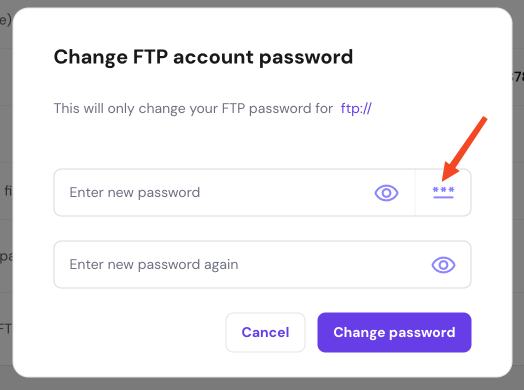
- Re-enter the password to confirm.
- Click Change Password button to apply the changes.
Make sure to store your new password in a secure location, such as a password manager, as it is hidden within hPanel at all times.
Change the password for additional FTP accounts
If you have manually created separate, secondary FTP accounts for specific directories, you can manage their access credentials from the same page.
- Scroll down to the FTP accounts listed at the bottom of the page.
- Locate the specific user account you want to modify.
- Click the Change password button located next to that account profile.

- Enter your new password twice to confirm it.
- Click Change password to complete the process.
Your new credentials are now updated and ready to be used to connect via FTP in your preferred client application.