How to integrate Stripe payments with Hostinger Horizons
Jun 19, 2026
/
Ariffud M. & Dainius K.
/
9 min Read

Stripe is a payment platform that lets you accept online payments and manage subscriptions securely. Integrating Stripe with a Hostinger Horizons web app gives you a complete, server-side subscription system without writing backend code yourself.
To integrate Stripe with your Hostinger Horizons web app, follow these steps:
- Prepare a database to store user and subscription data.
- Add sign-up and login for user accounts.
- Create a Stripe account.
- Build a subscription product and copy your API keys.
- Configure Stripe webhooks.
- Store your keys as environment variables.
- Link Stripe to your Horizons project.
- Test the payment flow.
- Add a customer portal so subscribers can manage their plans.
- Go live to accept real payments.
Before you start
Before adding Stripe, connect your web app to a custom domain. Stripe requires a live domain when setting up webhooks and going live, so this step is essential.
We’ll build a recurring subscription model where users pay a fixed monthly fee to access premium content. The same steps apply to any subscription-based use case, including membership sites, SaaS tools, and gated communities.
1. Set up the database for your project
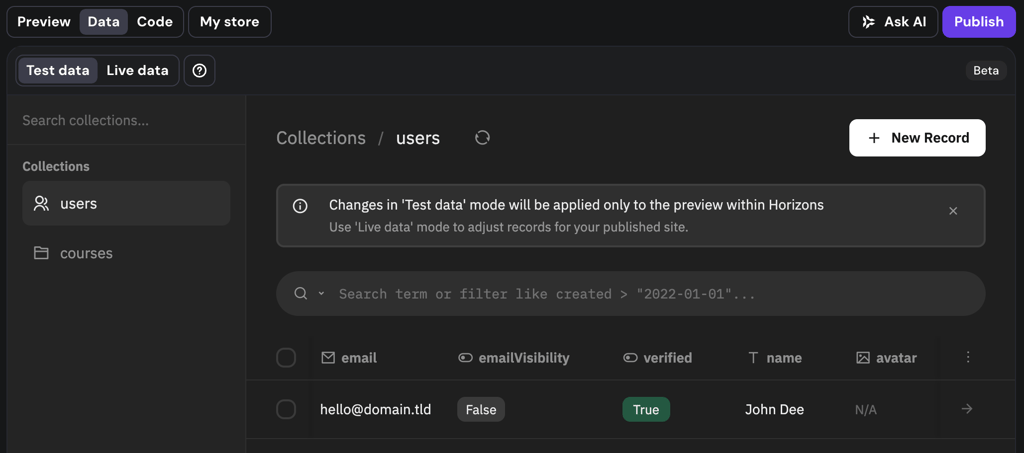
Hostinger AI app builder includes an integrated database you can access directly from the editor using the Data button. Before connecting Stripe, make sure your project has a database set up to store user and subscription data.
You don’t need to configure anything manually. Describe what you need in the Horizons chat, and the AI sets up the necessary database collections for you.
Open your Horizons project and use a prompt like:
Add user accounts to my project.
Once submitted, your data dashboard appears in the editor. You can view and manage live data after publishing your project.
2. Add sign-up and log-in functionality
With subscriptions, users need accounts so their subscription status ties to their identity. Add authentication before connecting Stripe.
In the Horizons chat, use a prompt like:
Add sign-up and login flows to my project with secure authentication.
If you’ve already added authentication, verify it’s set up correctly with:
Check if sign-up and login flows are fully and securely integrated with the database. I plan to use Stripe for subscriptions, so ensure user accounts are properly managed.
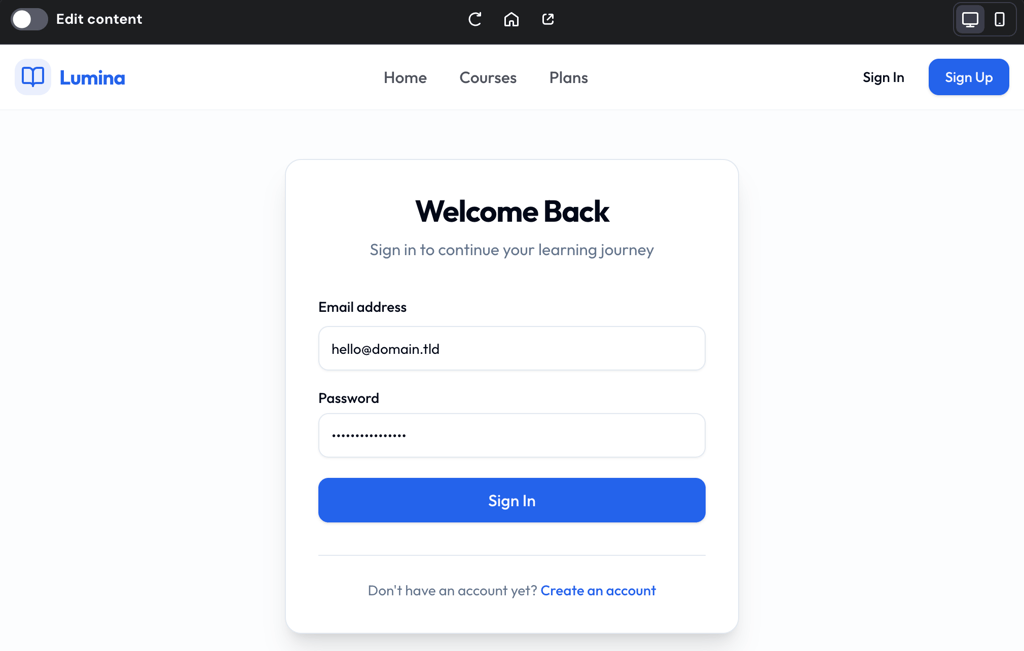
3. Sign up for a Stripe account
To start accepting payments, you’ll need a Stripe account:
- Go to the Stripe registration page and create your free account.
- Enter your email, password, and business or personal details.
- Check your inbox and verify your email address to activate the account.
Once your account is created, you’ll be redirected to Stripe Sandbox mode, a test environment that lets you simulate payments before going live.
If you want to set up your live Stripe account from the start, click Switch to live account in the top-right corner of the Stripe dashboard and complete the onboarding process.

4. Create a subscription product and get your API keys
A subscription product sets what users pay and how often, and your API keys let Horizons talk to Stripe. First, create the product:
- Go to Product catalog in your Stripe dashboard.
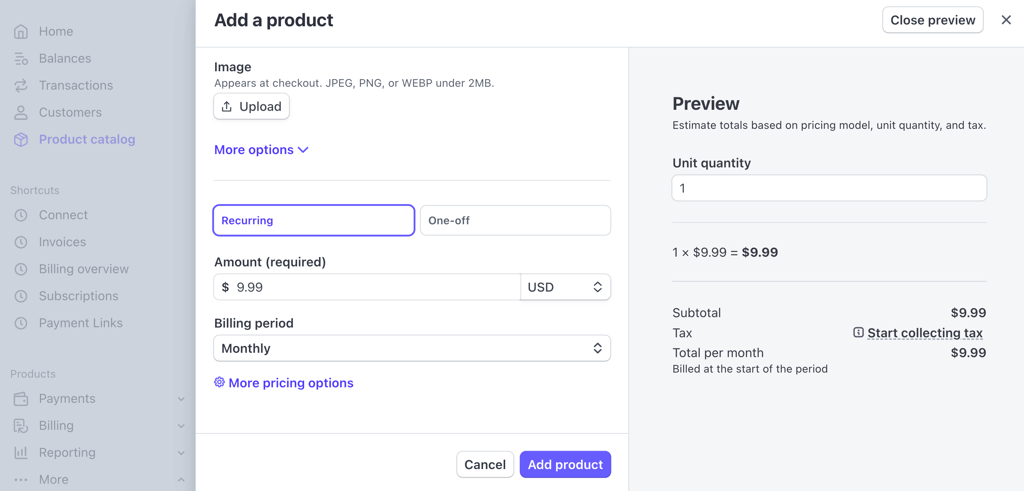
- Click + Add a product, then fill in the details:
- Name. Enter a clear name, such as Pro Plan.
- Pricing model. Select Recurring.
- Amount. For testing, set this to $0 so you can run the full purchase flow without being charged, then update the price before going live.
- Billing period. Choose Monthly, or adjust to fit your needs.
- Click Add product to save it.
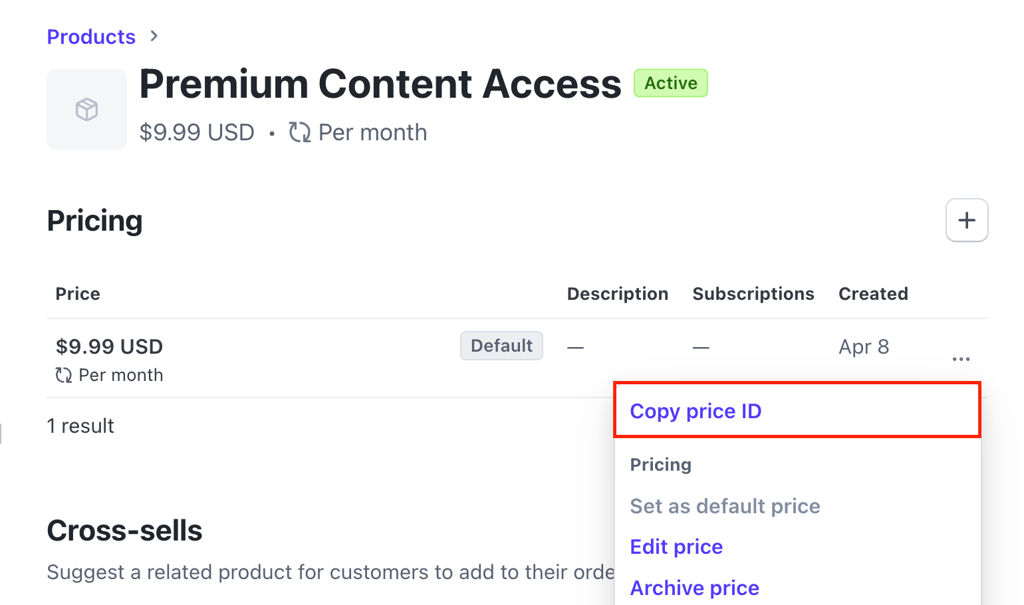
- Open the product, click the three-dot icon next to the price, and select Copy price ID.
Save this price ID. You’ll need it later, and it looks like price_….
Then, copy your API keys:
- Go to the API Keys page in your Stripe dashboard.
- Under Standard keys, copy both:
- Publishable key, which starts with pk_live_… (pk_test_… in Sandbox mode).
- Secret key, which starts with sk_live_… (sk_test_… in Sandbox mode).
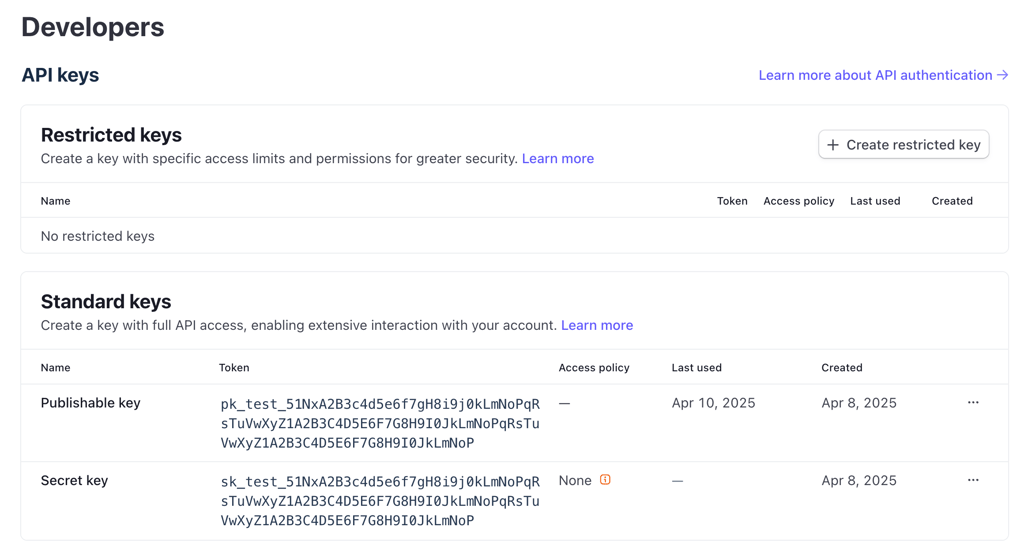
Important! Your secret key provides full access to your Stripe account. Never share it or expose it in your frontend code, and save it somewhere secure, because you won’t be able to view it again after leaving the page.
5. Set up Stripe webhooks
Webhooks are how Stripe communicates with your project. They keep subscription statuses in sync, for example when a payment succeeds, fails, or a user cancels their plan.
First, ask Horizons to create a webhook endpoint. Horizons uses an Express API server for server-side logic, so use a prompt like this to add the API route that receives Stripe webhook events:
Create an API route on the server that exposes an endpoint URL for handling Stripe webhooks. You can name it stripe-webhook. Don't make any other changes to the project!
Horizons generates a webhook endpoint URL. Copy it, since you’ll need it in the next step.
Then, create the webhook in Stripe:
- Go to Developers → Webhooks in your Stripe dashboard.
- Click + Add destination.
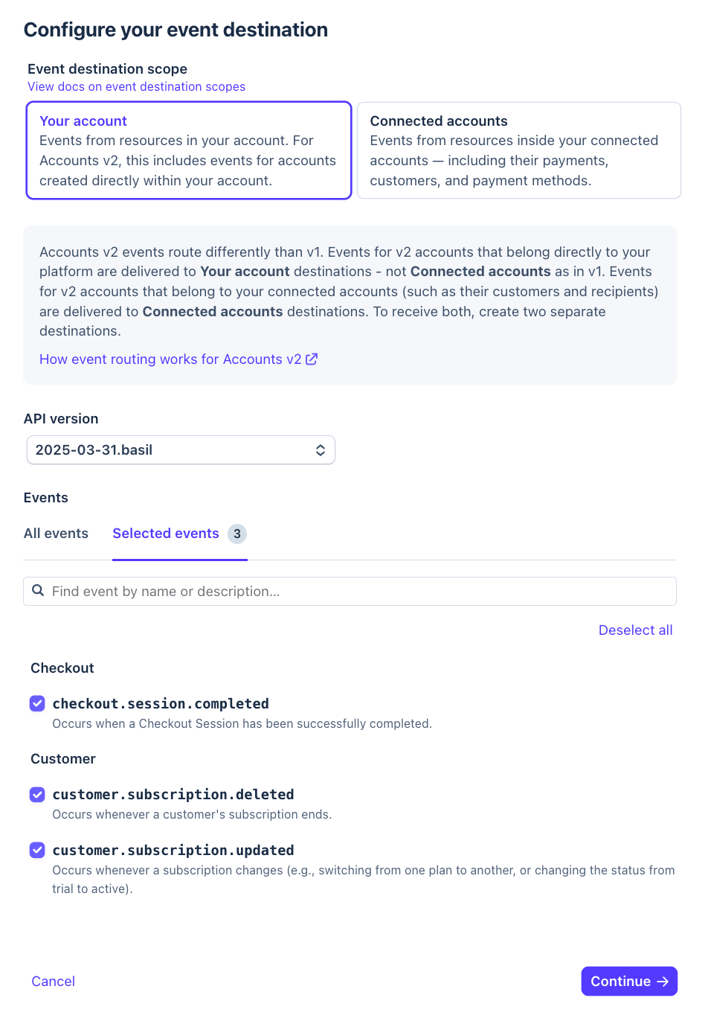
- In the first step, select Your account, then search for and select these three events:
- checkout.session.completed.
- customer.subscription.updated.
- customer.subscription.deleted.
- Click Continue.
- In the next step, select Webhook endpoint and click Continue.
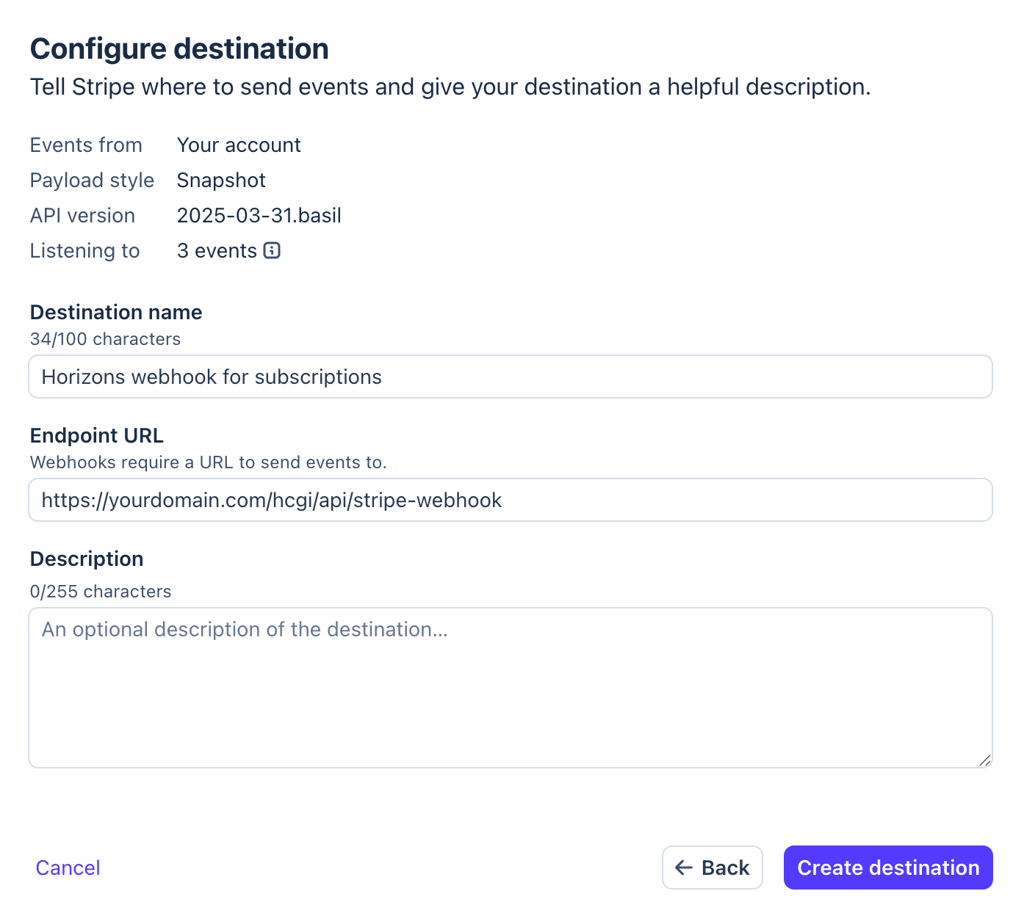
- Fill in the following fields:
- Destination name: enter something like “Horizons webhook for subscriptions.”
- Endpoint URL: paste the URL generated by Horizons in the previous step.
- Complete the setup.
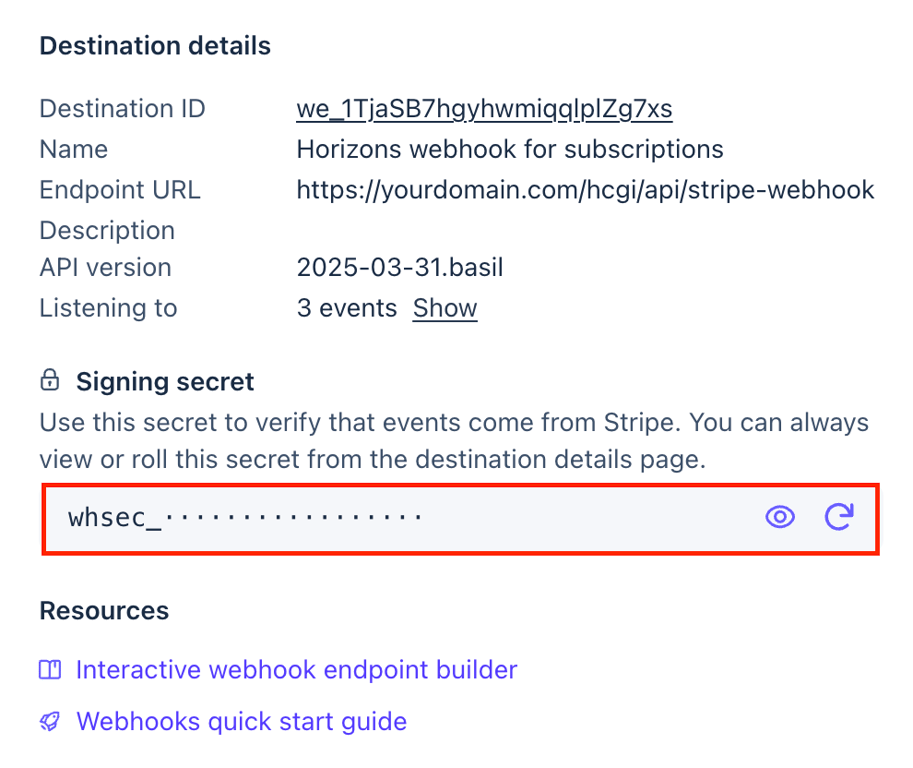
After completing the setup, Stripe provides a signing secret that starts with whsec_…. Copy and save it, since you’ll need it in the next step.
6. Save your Stripe keys as environment variables
To keep your secret key and webhook signing secret secure, save them as environment variables on the Horizons API server. This keeps them out of your frontend code.
In the Horizons chat, use this prompt, replacing the placeholder values with your actual keys from steps 4 and 5:
Add the following environment variables to the API server:

STRIPE_SECRET_KEY = sk_live_…
STRIPE_WEBHOOK_SECRET = whsec_…

Don't make any other changes to the project!
7. Connect Stripe with your Horizons project
The prompt below securely connects your Stripe subscription to your project, handling checkout, webhooks, the subscription product, and access control in one step.
Before sending, replace the placeholder values with:
- Your price ID (from step 4), which looks like price_….
- Your publishable key (from step 4), which looks like pk_live_….
- Your actual domain in place of your-domain.
I want to securely integrate Stripe to sell subscriptions in my Hostinger Horizons project.

I have already stored my Stripe keys as environment variables on the API server:

Secret key: STRIPE_SECRET_KEY
Webhook signing secret: STRIPE_WEBHOOK_SECRET

Step 1: Checkout session & webhooks

Create an API route on the server that handles Stripe checkout sessions. When a user starts the subscription purchase flow, securely create a Stripe Checkout session using my stored secret key and return the session URL for redirecting the user.

When creating the Stripe Checkout session, pass both success_url and cancel_url. Make sure these URLs use my site's domain: your-domain.

Create a Stripe customer and save the generated stripe_customer_id to the database.

For any updates received from the Stripe webhook, use the stripe_customer_id to find and update the correct user record in the database.

Step 2: Subscription product

Add my Stripe subscription product to the Horizons project.

Stripe product price ID: price_…
Stripe publishable key: pk_live_…

Add an "Upgrade" button in the project that triggers the subscription purchase flow.

Ensure the subscription is fully linked to the user database.

Only users with an active subscription can access premium features.

Step 3: Access control

Instantly grant users premium access after purchase.

Ensure subscription status is checked in real-time when users log in, create an account, or try to access premium features.

Step 4: Security & correctness

Ensure the integration is secure and does not expose secret keys to the frontend.

Handle all Stripe communication server-side via the API server.
Give Horizons a moment to process and apply the changes.
8. Test the payment integration
Your web app should now be ready to accept test payments. You can’t test the Stripe integration using the preview pane in Horizons, because the live preview runs within a sandboxed iframe that restricts redirects for security.
- Click Publish in the top-right corner of the project dashboard to launch your app.
- Open your web app through your custom domain and try subscribing.
- On the Stripe checkout page, use these test details:
- Card number. 4242 4242 4242 4242.
- Expiration date. Any future date.
- CVC. Any 3-digit number (4 digits for Amex test cards).
- Name, email, country. Any values.
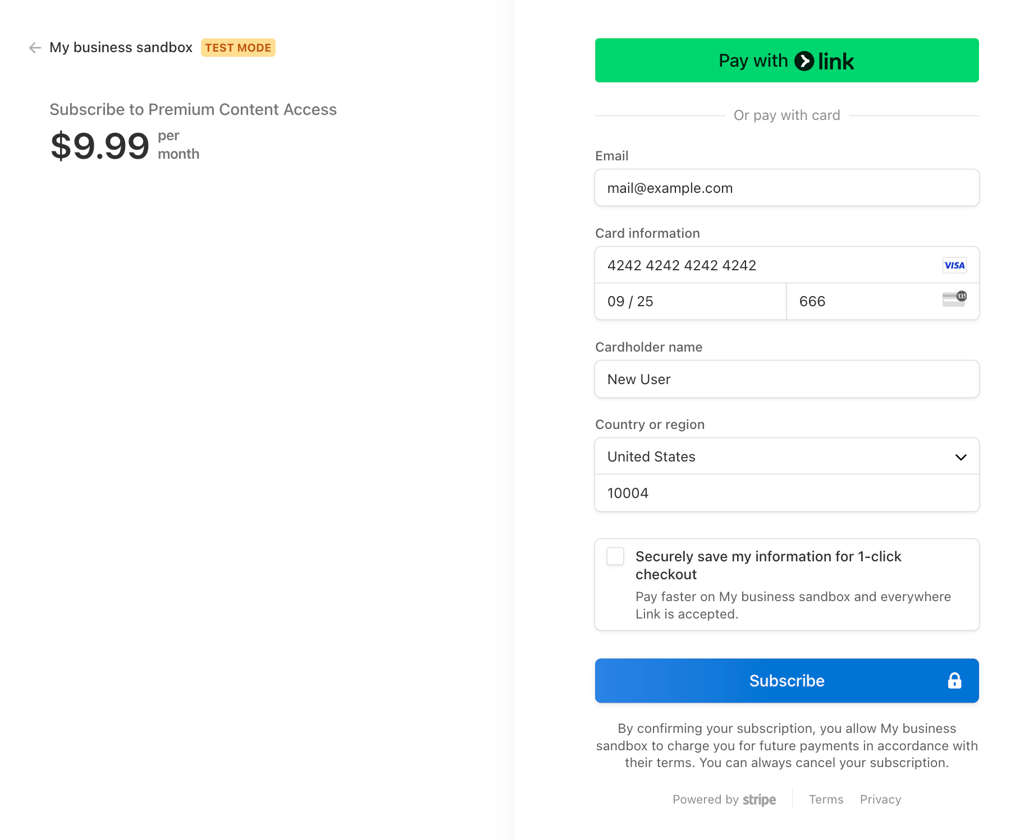
If the payment succeeds, you’ll be redirected back to your app with premium access granted. You can also verify the subscription in your Stripe dashboard under Customers.
Pro tip
Since you set the test product price to $0 in step 4, you can complete the full purchase flow without any charges. Update the price to your actual rate before going live.
9. Add a customer portal for subscription management
Once your subscription flow is working, give users the ability to manage their own subscriptions through Stripe’s built-in customer portal, where they can update payment methods, view invoices, or cancel.
- Go to Settings → Billing → Customer portal.
- Find the Launch customer portal with a link section.
- Click Activate link to enable the portal.
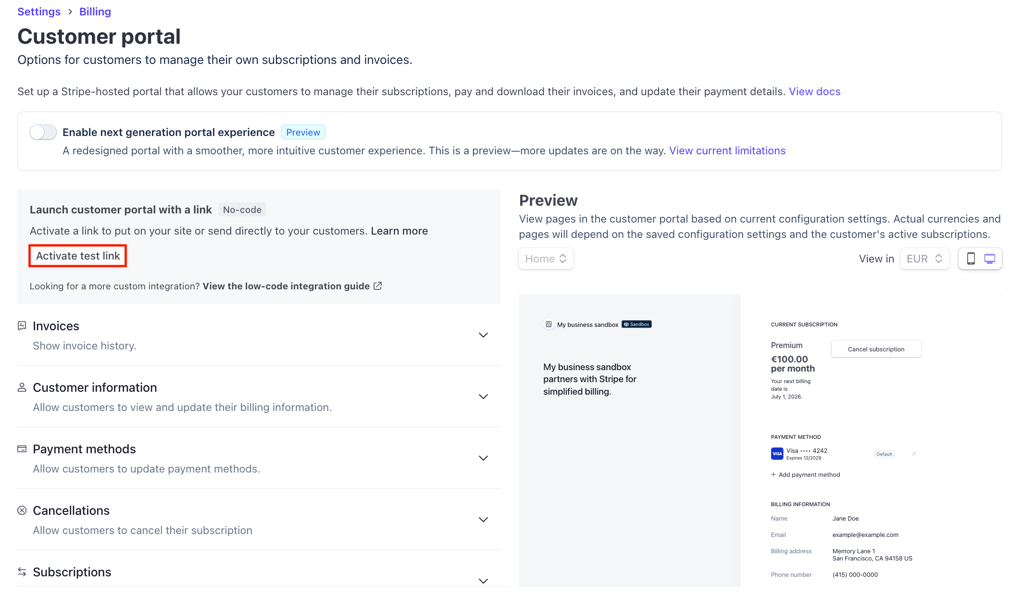
Then, go back to Horizons and use this prompt:
Create a new API route on the server that securely generates a link to the Stripe Customer Portal for the logged-in user.

Then, add a "Manage subscription" button to my project. This button should be visible only to paid users. Clicking it should redirect users to the Stripe Customer Portal, where they can manage their subscriptions.
10. Switch to live mode
Once you’ve tested your web app and are ready to accept real payments, switch to live mode in Stripe.
Important! Once live mode is active, test card numbers no longer work. Real credit cards result in actual charges, so proceed carefully.
- In your Stripe dashboard, click Get your live account at the top of the page and complete the onboarding, which includes entering your business details and bank account information.
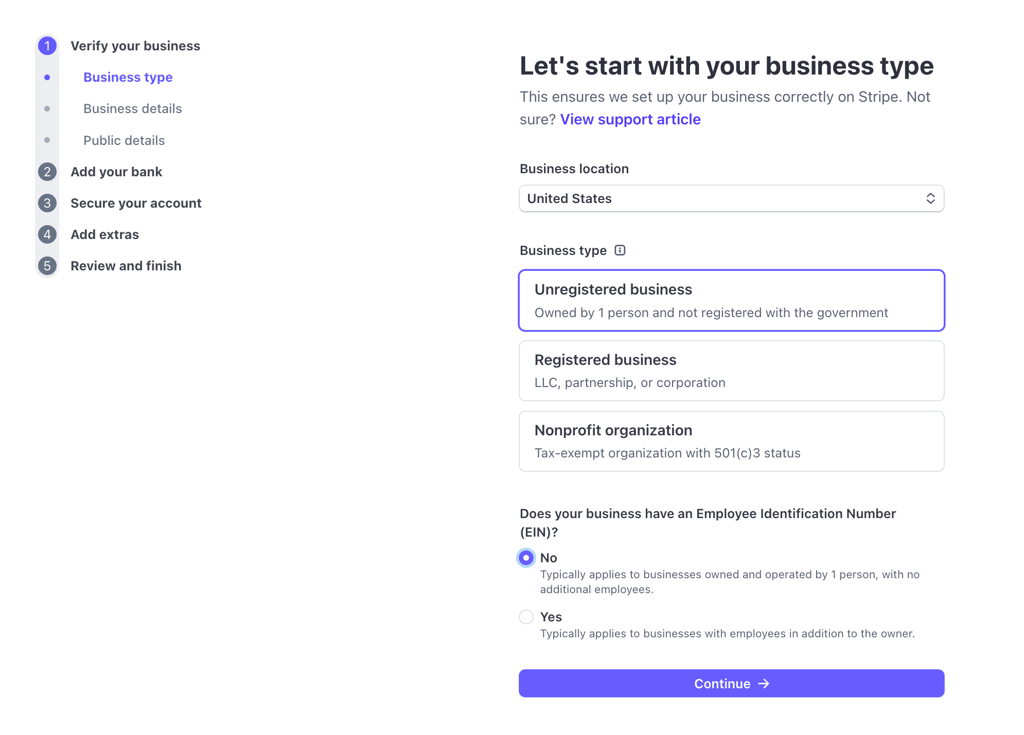
- Go back to Product catalog and create a new product with your actual live pricing.
- Go to API Keys and copy your live publishable key (pk_live_…) and live secret key (sk_live_…).
- Set up a new webhook endpoint pointing to your live domain (repeat step 5 using your live domain URL).
- In Horizons, update your environment variables with the live keys (repeat step 6 with live values).
Use this prompt to update the integration with your live credentials:
I've switched Stripe to live mode. Can you update my web app with the live price ID and publishable key? Here are the details:

price ID: price_…
publishable key: pk_live_…
Re-publish your app once Horizons finishes processing.
Why integrate Stripe with Hostinger Horizons?
Connecting Stripe with Hostinger Horizons gives you a complete, server-side way to accept recurring payments directly in your web app. Horizons handles your frontend and backend while Stripe manages the payments, so you get:
- Recurring billing on a monthly, yearly, or custom cycle
- Server-side payment processing that keeps sensitive keys off the frontend.
- Webhook-based subscription tracking that keeps statuses in sync automatically.
- A customer portal for updating payment methods, viewing invoices, and canceling.
Whether you’re running a paid membership platform, a SaaS tool, or a premium content site, this setup gives you a strong base to monetize your app and grow it over time.
Stripe integration use cases
A recurring subscription is one of several ways to charge with Stripe. Two other common models are one-time per-item purchases and pay-what-you-want donations.
Per-item purchases
For individual items or digital products like ebooks or courses, Hostinger Horizons has a built-in Online Store that handles one-time payments automatically, so you don’t need to set up Stripe yourself.
To handle it manually instead, create a product for each item in Stripe and set a one-time payment pricing model to process single transactions.
Then, note each product’s price ID and share it with Hostinger Horizons so it updates the payment process for each item. Here’s an example prompt:
I want to set up Stripe payments for the following products. Here are their price IDs:
price_abc123... for "Product 1"
price_xyz789... for "Product 2"
Donations and pay-what-you-want
A pay-what-you-want model lets users choose how much to donate, which suits creators, nonprofits, and other donation-based web apps.
In Stripe, go to Payment Links → Create payment link, then select Customers choose what to pay as the payment type. Configure the other settings and click Create link.
Then, copy the generated link and share it with Hostinger Horizons. To add a donation button, use a prompt like this:
I want to add a Support Us button that lets users contribute any amount. Link it to [the Stripe donation link].
Security best practices when using Stripe on your web app
When integrating Stripe into your web app, follow these tips to minimize vulnerabilities:
- Never expose secret keys in frontend code. Secret keys provide full access to your Stripe account, so always store them as server-side environment variables, as shown in step 6.
- Validate webhook signatures server-side. Stripe includes a signature with each webhook event to prove it’s genuine, so use your STRIPE_WEBHOOK_SECRET to verify it before processing any event.
- Use HTTPS to encrypt all data between users and your app. Hostinger provides free SSL for your web app, and Stripe’s checkout page is served over HTTPS by default.
- Keep test and live environments separate. When moving to production, switch to live mode keys, update webhook endpoints to production URLs, and keep test data away from real transactions.
Troubleshooting Stripe integration issues
Even with a proper setup, you may run into issues. Here are the most common ones and how to fix them:
Invalid price ID or API keys
This happens when the keys in your project don’t match those in your Stripe dashboard.
- Go to Developers → API keys → Standard keys to find the correct publishable key.
- For price IDs, go to Product catalog, open your product, and click the three-dot icon next to the price.
- Ask Horizons to update the credentials with the correct values.
- Double-check for typos or extra spaces.
Webhook not firing
This happens when Stripe can’t reach your webhook endpoint, or the endpoint isn’t processing events correctly.
- Verify your webhook endpoint URL is correct in Developers → Webhooks.
- View webhook attempts in Developers → Events.
- Test the webhook using Stripe’s built-in webhook tester in the Webhooks tab.
- Make sure your STRIPE_WEBHOOK_SECRET environment variable is set correctly in Horizons.
Subscription status not updating after payment
This happens when the webhook isn’t updating the user record in the database correctly.
Take a screenshot of the issue and describe the expected behavior to Horizons:
After completing the subscription purchase flow, users are redirected back to the project, but their subscription status is not updated, and premium features are not unlocked. Ensure the subscription is verified on return and the user is granted access to premium features immediately. Identify and fix the issue.
Checkout failing to redirect
This occurs when the success and cancel URLs aren’t configured correctly.
- Verify that the success and cancel URLs match your actual domain.
- Check the browser console for errors during the redirect.
- Make sure the domain in your Stripe Checkout session matches your published app URL.
How to create a membership website
A membership website builds on the Stripe subscription system you just set up, adding membership tiers, gated content, and a member area on top of the billing flow.
The sign-up, login, and subscription logic already handle the hard part, so the rest is mostly content structure and access rules.
Here are the steps to build a membership website:
- Define your membership tiers. Decide how many levels you need, such as a free tier and one or more paid tiers, then create a Stripe price for each and connect it to your project the same way you connected your first subscription product.
- Gate content by tier. Extend your access control so each piece of content checks the user’s active tier, not only whether they hold any subscription.
- Add a member dashboard. Give members one place to see their tier, open their content, and launch the Stripe customer portal to manage billing.
- Organize your member-only content. Group your premium pages, downloads, or courses so each tier sees only what it pays for.


Ariffud is a Technical Content Writer with an educational background in Informatics. He has extensive expertise in Linux and VPS, authoring over 200 articles on server management and web development. Follow him on LinkedIn.

Dainius Kavoliunas is the Head of Product for Hostinger Horizons, with a passion for building innovative solutions. As an expert in product management, he combines deep expertise in UX, experimentation, and data analysis with a technical background to lead product strategy and build strong teams. He is particularly excited about the practical applications of AI and its potential to transform how we work and live. Follow him on LinkedIn.