Minecraft server commands: complete list and how to use them
Jun 25, 2026
/
Valentinas C.
/
8 min Read

Minecraft server commands let admins manage players, change world settings, control gameplay rules, and automate repetitive tasks from the console or in-game chat. They help you stop griefing, teleport stuck players, change game modes, manage whitelists, and make quick server changes without relying on plugins for every action.
The most useful Minecraft server commands are grouped by admin task:
- Automation commands for command blocks, aliases, and shortcuts that reduce repetitive admin work.
- Player management commands for banning users, granting permissions, whitelisting players, and checking player status.
- World and gameplay commands for changing game modes, weather, time, difficulty, and gamerules.
- Navigation commands for teleporting players, finding coordinates, and moving around the world faster.
- World border commands for limiting map size and controlling exploration.
What are Minecraft server commands?
Minecraft server commands, or slash commands, allow you to control various server aspects, from managing players to changing world settings. You can use commands to teleport players, change the game mode, or ban unruly users with just a few keys.
Unlike single-player commands such as /gamemode to switch between game modes or /give to spawn items, Minecraft server commands require higher permissions, such as being an operator (op) or a server admin.
This setup ensures that only trusted individuals can make major changes to the server. Regular players won’t have access to most server commands unless the server admin grants them the right permissions.
How to enter Minecraft server commands
You can input Minecraft server commands in a couple of ways – through the server console or the in-game window. Let’s take a look at both methods.
Operator permission levels
Before you can run server commands, you need operator (op) status. Minecraft Java Edition uses four operator levels, each unlocking a different set of commands:
| Level | What it allows |
|---|---|
| 1 | Bypass spawn protection only |
| 2 | Most gameplay commands (/give, /tp, /gamemode, /time, /weather, /effect, /gamerule) |
| 3 | Server management commands (/ban, /kick, /whitelist, /op, /deop) |
| 4 | Full access, including /stop |
When you grant op status with /op <player>, the default level is 4 — full access. You can set a lower default op level in your server.properties file by changing the op-permission-level value.
Note: On Bedrock Edition, operator permissions work differently. Bedrock uses a single operator status rather than numbered levels, and some Java commands aren’t available or have different syntax. Bedrock-specific differences are noted throughout this guide.
Understanding command syntax
Throughout this guide, commands use two types of argument notation:
- <argument> – required. The command won’t run without it.
- [argument] – optional. The command uses a default value if you leave it out.
For example, /ban <player> [reason] requires a player name, but the reason is optional.
Target selectors
Many commands accept a target selector instead of a player name, letting you affect multiple players or entities at once:
| Selector | Targets |
|---|---|
| @a | All players on the server |
| @p | The nearest player to you |
| @e | All entities (players, mobs, items) |
| @r | A random player |
| @s | Yourself |
You can also filter selectors with conditions. For example, /kill @e[type=!player] kills all entities except players, useful for clearing hostile mobs without affecting anyone on the server.
Server console interface
As the server owner or admin, you can easily enter commands directly through the server console, which is crucial for managing and troubleshooting your Minecraft server. This gives you a straightforward way to run commands, especially when you’re managing the server remotely.
If you’re using Hostinger’s Minecraft hosting, you can access the console by accessing simply clicking Manage panel in your Minecraft plan’s dashboard of hPanel.

In addition to running commands, the server console allows you to monitor real-time server activity. You can see player actions, error messages, and logs that help troubleshoot issues like connection problems, plugin errors, or crashes that might affect gameplay.
Using the console command interface ensures you have full control over the server’s operation. This way, you can quickly respond to problems or adjust settings without needing to be in the game.
In-game chat window
Another easy way to use Minecraft server commands is through the in-game chat window. Simply open the chat by pressing T (the default key) and start your command with a forward slash (/), followed by the specific command you want to execute.
For example, typing /op [player] instantly grants that player operator status.
Using the in-game chat to issue commands is especially useful when you’re already in the game and need to quickly adjust settings or manage players. It’s a fast and direct way to make changes without needing to switch to the server console.
The chat window also lets you see the results of your commands immediately. You can also access a list of previously executed commands by pressing the up arrow key, which saves you from retyping frequently used commands.
Entering commands on a dedicated Minecraft server
Unlike the in-game chat window, using the server console interface for your dedicated server gives you more control and options when inputting commands. You can navigate to the server console using Remote Desktop Protocol (RDP), Secure Shell (SSH), or server management software.
Access using RDP or SSH
When hosting your own dedicated Minecraft server on a VPS or physical machine, you can access the server using RDP for Windows servers and SSH for Linux servers.
Once connected to your server, navigate to the directory where Minecraft is installed and run the Minecraft server’s executable file. After starting the server, you can type commands directly into the terminal.
Access through server management software
Some users prefer server management tools like MultiCraft or McMyAdmin, which provide a graphical interface for managing a Minecraft server.
These tools allow you to enter commands easily via a web-based interface without needing to access the server console directly. Commands can be entered in real time, and these platforms also offer options to automate recurring tasks.

Prerequisites for entering Minecraft server commands
Before entering commands, ensure you have the necessary permissions. This typically involves setting yourself up as an operator on the server. To do this, access the server console and enter /op [your username], which permits you to use all server commands if you’re running Minecraft Java edition.
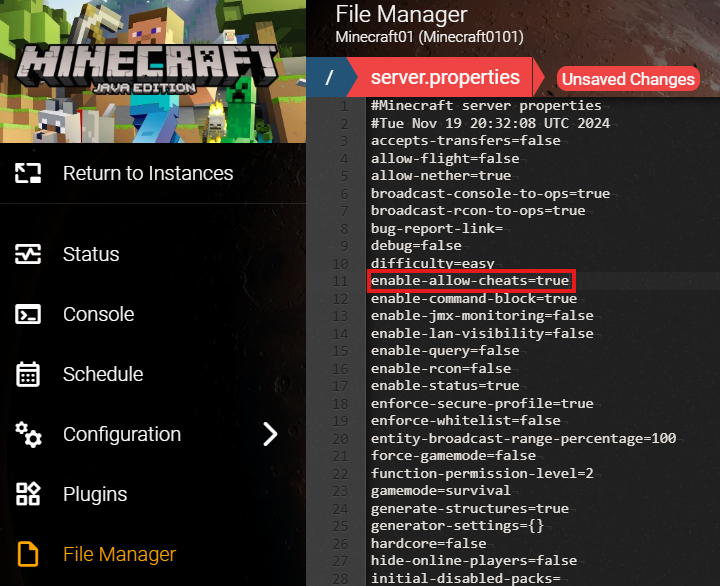
If you’re running a Bedrock server, certain commands won’t function without the proper setup, even if you’re an operator. You also need to enable cheats.
To enable cheats on Bedrock edition, navigate to your server.properties file, and locate the allow-cheats setting. Set it to true, save the server.properties file by clicking the green Save button in the top-right corner, and restart your server to permit all cheat-related commands.
Most popular Minecraft server commands
There are over 100 commands available in Minecraft Java Edition, but a smaller set covers the vast majority of day-to-day server management. Here are the most commonly used ones, grouped by what they do.
Player permissions
| Command | What it does |
|---|---|
| /op <player> | Grants operator status (level 4 by default). Must be run from the server console — you can’t op yourself in-game. |
| /deop <player> | Removes operator status from a player. |
Player management
| Command | What it does |
|---|---|
| /kick <player> [reason] | Disconnects a player from the server. They can rejoin immediately. |
| /ban <player> [reason] | Permanently bans a player by username. They cannot rejoin until pardoned. |
| /ban-ip <player|ip> [reason] | Bans a player by IP address. Use this when a banned player keeps rejoining with alternate accounts. |
| /pardon <player> | Removes a player from the ban list so they can rejoin. (Java Edition — Bedrock uses /unban) |
| /banlist [ips] | Lists all currently banned players. Add ips to show IP bans instead. |
| /whitelist <add|remove|list|on|off> | Manages the server whitelist. When on, only players on the list can join. |
Java vs Bedrock: Java Edition uses /pardon to unban players. Bedrock Edition uses /unban. If you’re running a Java server, /unban won’t work.
Gameplay and world control
| Command | What it does |
|---|---|
| /gamemode <mode> [player] | Changes a player’s game mode. Valid modes: survival, creative, adventure, spectator. |
| /give <player> <item> [count] | Spawns an item directly into a player’s inventory. Use the full item ID, e.g. minecraft:iron_pickaxe. |
| /tp <player> [target|x y z] | Teleports a player to another player or to exact coordinates. |
| /time set <day|night|noon|midnight|number> | Changes the time of day. You can also use a specific tick value (0–24000). |
| /weather <clear|rain|thunder> [duration] | Changes weather conditions. Duration is in seconds. |
| /gamerule <rule> [value] | Modifies game rules. Common uses: /gamerule keepInventory true (players keep items on death), /gamerule doDaylightCycle false (freeze time), /gamerule mobGriefing false (stop creeper/enderman damage). |
| /difficulty <peaceful|easy|normal|hard> | Sets the server difficulty level. |
| /effect <player> <effect> <duration> [amplifier] | Applies a status effect to a player, e.g. speed, invisibility, regeneration. Duration is in seconds. |
| /clear [player] [item] [count] | Clears items from a player’s inventory. Omit the item to clear everything; specify an item ID to remove only that type. |
| /kill [target] | Kills players or entities. Use /kill @e[type=!player] to remove all mobs without affecting players. |
| /summon <entity> [pos] | Spawns any entity at your location or at specified coordinates. |
| /msg <player> <message> | Sends a private message to a player. Also works as /tell and /w. |
| /experience add <player> <amount> [points|levels] | Gives experience to a player. Use levels to add whole levels instead of raw XP. Also works as /xp. |
Navigation and location
| Command | What it does |
|---|---|
| /locate biome <biome_name> | Returns the coordinates of the nearest biome, e.g. plains, desert, mushroom_fields. (Added in Java 1.19 — replaces /locatebiome) |
| /locate structure <structure_name> | Finds the nearest generated structure, e.g. village, stronghold, mansion, trial_chambers. |
World border
| Command | What it does |
|---|---|
| /worldborder set <size> | Sets the diameter of the world border in blocks. |
| /worldborder add <size> [time] | Expands or shrinks the border over a set time in seconds. |
| /worldborder center <x> <z> | Moves the center of the world border. |
| /worldborder get | Shows the current border size. |
| /worldborder warning distance <blocks> | Sets how far from the border players see a warning overlay. |
For a full walkthrough on setting up and configuring your world border, see how to set a world border in Minecraft.
Server management
| Command | What it does |
|---|---|
| /save-all | Forces the server to write all unsaved chunks to disk. Run this before shutting down or making major changes. This is not a full backup — pair it with a backup plugin for full protection. |
| /stop | Safely shuts down the server, saving all data first. Requires op level 4. |
| /whitelist reload | Reloads the whitelist from disk, useful after editing whitelist.json manually. |
| /perf | Runs a 10-second performance diagnostic and outputs debug files to your server folder. Useful for diagnosing lag spikes. |
Advanced server commands
Beyond daily management, these commands give you finer control over server behavior and are worth knowing for troubleshooting and administration.
| Command | What it does |
|---|---|
| /datapack <enable|disable|list> [pack] | Controls which datapacks are active on your server. |
| /forceload add <from> [to] | Forces a chunk or range of chunks to stay loaded even when no players are nearby. Useful for farms and redstone contraptions. |
| /schedule function <name> <time> | Schedules a datapack function to run after a set delay. |
| /tag <target> add|remove|list <name> | Assigns or removes tags from entities, which can then be used in command selectors. |
| /scoreboard objectives add <name> <criteria> | Creates a scoreboard objective for tracking stats like kills, deaths, or custom values. |
| /execute as <target> at <target> run <command> | Runs a command as and/or at a specific entity — the foundation of complex command-block logic. |
Tips for managing Minecraft server commands efficiently
When managing server commands, the right strategies and tools can help you save time and prevent common issues. Let’s walk through some practical tips to help you manage commands more effectively.
Use Minecraft command blocks for automation
Command blocks make it easy to automate tasks on your server. You can use them to set up teleportation points, spawn items, or even create mini-games.
First, enable cheats and get a command block with /give [your username] minecraft:command_block. Place the block and open the command block screen. Here, you can enter your command, choose the block type (Impulse, Chain, or Repeat), and adjust how it’s triggered. Once set up, the command block takes care of everything.
For example, if you want to greet new players automatically, place a command block and input /say Welcome to the server! Each time someone joins, the message appears, giving your server a more engaging and welcoming vibe.
Use command shortcuts and aliases
Typing out long or complex commands repeatedly can be time-consuming. To save time, you can use command shortcuts and aliases. Many server platforms allow you to create custom command shortcuts, making it quicker to execute frequently used ones.
You can set up command shortcuts and aliases by creating custom commands in your server’s configuration files. This allows you to replace longer commands with shorter, more convenient ones.
For example, instead of typing /gamemode survival every time, you could set up a shortcut like /gms to get it done faster.
If you’re using Hostinger, you can manage these aliases through the control panel.
How to set up command shortcuts and aliases on Hostinger
Here’s how you can set up custom command shortcuts on a Minecraft server hosted with Hostinger:
1. Access the server console by logging into your Hostinger hPanel and navigating to the Game Panel. Open the File Manager to access your server’s files.
2. Locate the command aliases or configuration file. For Bukkit or Spigot servers, look for the commands.yml file in the server root directory. Look for a similarly named file for servers not running Bukkit or Spigot. For example, servers using EssentialsX should have a config.yml file in the EssentialsX plugin folder.
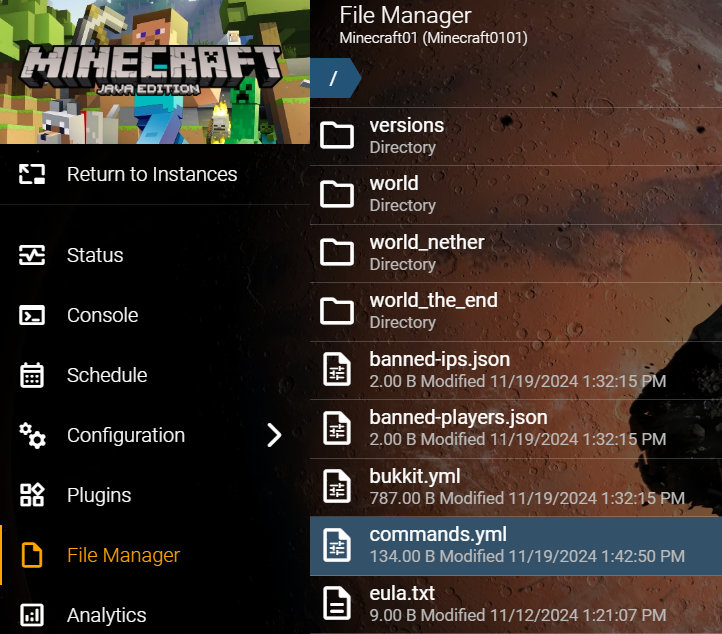
3. Find the aliases section within your command or configuration file. Another common name for this section is command aliases. Double-click to open the file.

4. Add your alias by creating a line in the configuration file and following the appropriate structure.
For Bukkit and Spigot servers:
gmc:
- “gamemode creative”

gms:
- “gamemode survival”

home:
- “warp home”
For servers using EssentialsX:
gmc: gamemode creative

gms: gamemode survival

home: warp home
For these examples, typing /gms will run the /gamemode survival command, typing /gmc changes your game to the creative mode by running the /gamemode creative command, and typing /home runs the /warp home command to teleport you to a saved location quickly.
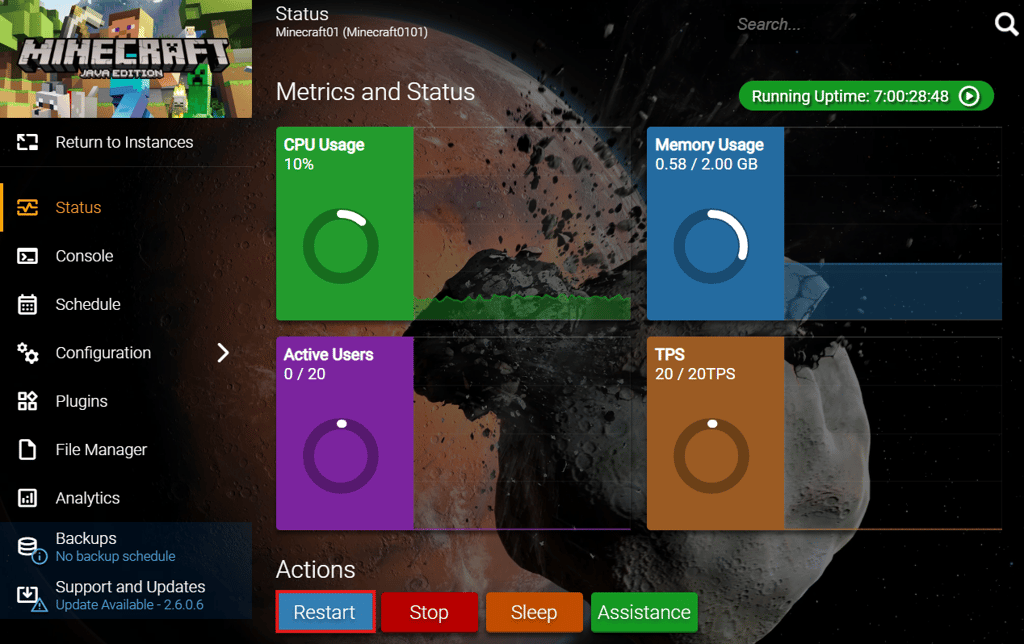
5. Once you’ve defined the aliases, click the green Save button in the top-right corner of the Hostinger Game Panel to save your file. Then select Status from the left-hand menu and click Restart to restart your server so the changes take effect.
Back up your server regularly
Before making major changes, such as adding new plugins or changing game rules, always back up the server. You can do this manually using the /save-all command or automate the process with server plugins like Server Backup or DriveBackupV2. This ensures that if something goes wrong, you can restore your server to a previous state.

Conclusion
Minecraft server commands help admins manage players, control gameplay rules, adjust world settings, and automate repetitive tasks without leaving the console. Start with the core commands for banning players, changing game modes, teleporting users, setting gamerules, and managing whitelists. Then, use command blocks, aliases, and scheduled commands to make repeated server actions faster.
For easier server management, Hostinger’s Minecraft server hosting includes a browser-based console where you can run commands, adjust server settings, and manage your server without manually editing every configuration file.


Valentinas Čirba, Hostinger's Head of VPS, is a seasoned product leader specializing in VPS products with over ten years of experience. He's an expert at setting product strategy, leading cross-functional teams, and making smart decisions to deliver innovative solutions. Valentinas is committed to creating products that not only meet business objectives but also truly serve the customer. Follow him on LinkedIn.